Create and prepare models in OrcaSlicer
Generate or upload a model, check and repair it, and add it to your plate, using the Meshy tab or the Meshy panel.
Before you begin
-
Install the Meshy plugin and sign in. For the steps, see Meshy for OrcaSlicer.
-
You need a Meshy account on a Pro plan or higher. For credit costs, see Plans and credits.
The Meshy tab
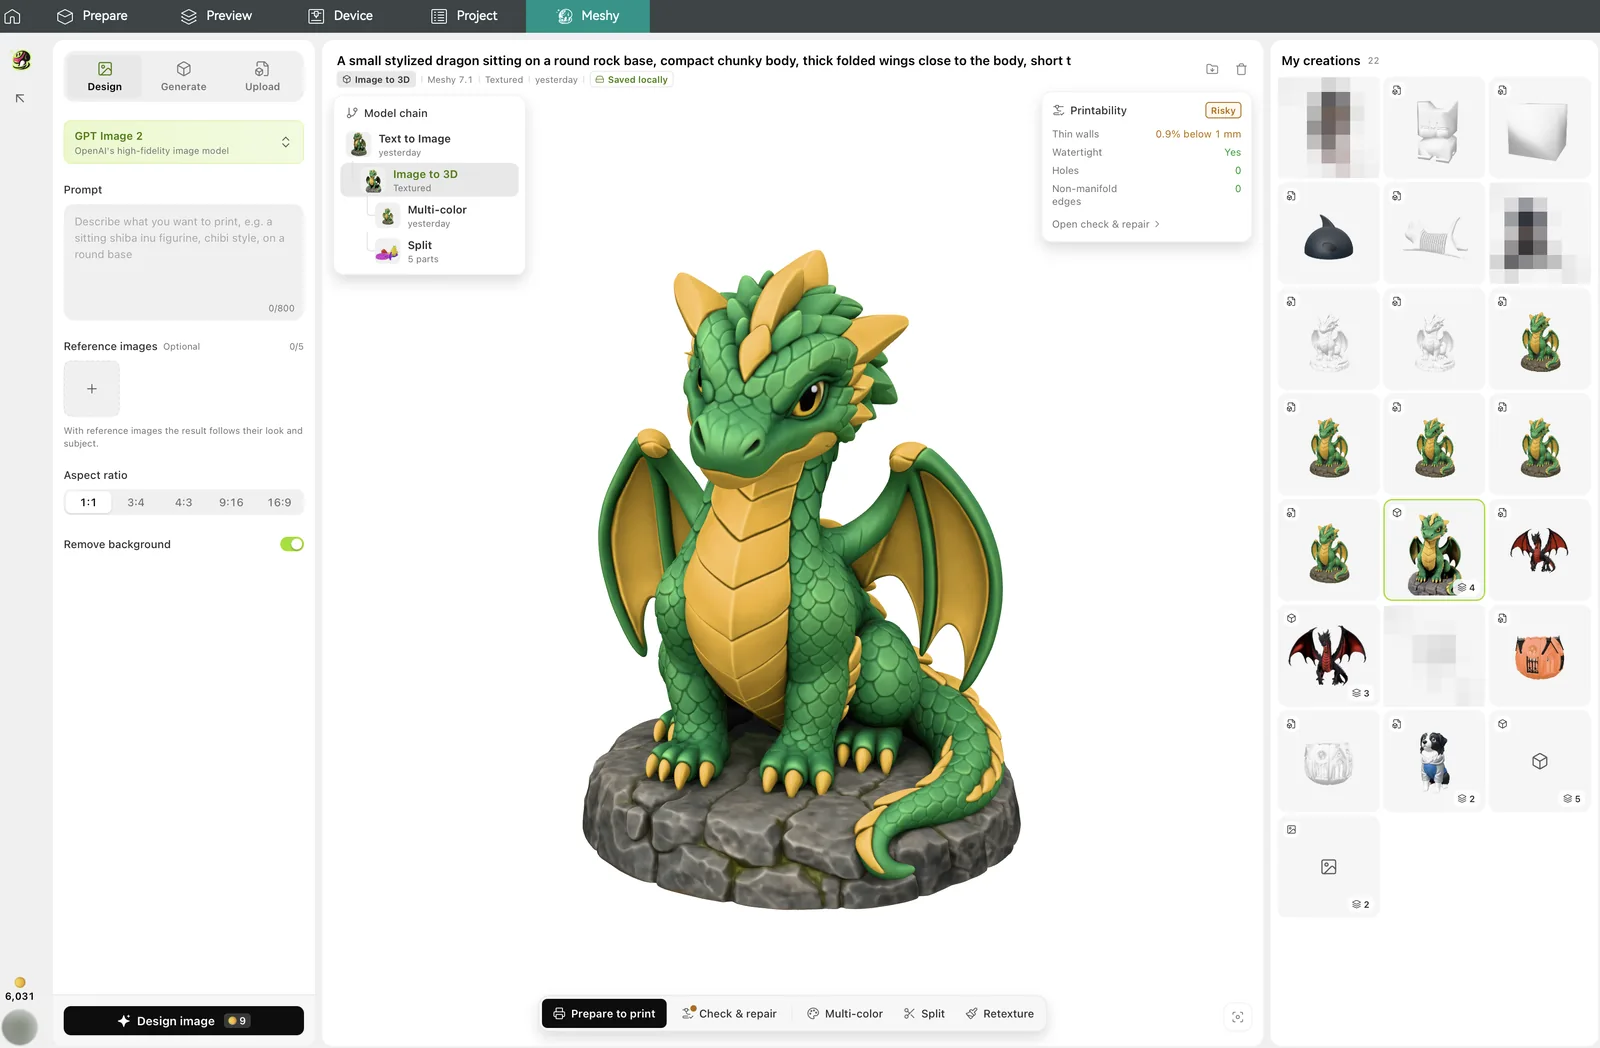
The Meshy tab has four areas:
- Left rail: a button that opens the Meshy panel, your credit balance, and your account menu.
- Create form: three modes, Design, Generate, and Upload, and the button that starts the task.
- Preview: a 3D view of the selected result, its toolbar, and the Model chain.
- My creations: your earlier images and models.
Each result keeps its versions as a model chain. For example, a generated model, its repaired version, and a multi-color version of it sit in one chain. Select any version to preview it and to run the next tool on it. To return to the default angle, click Reset view.
Design an image
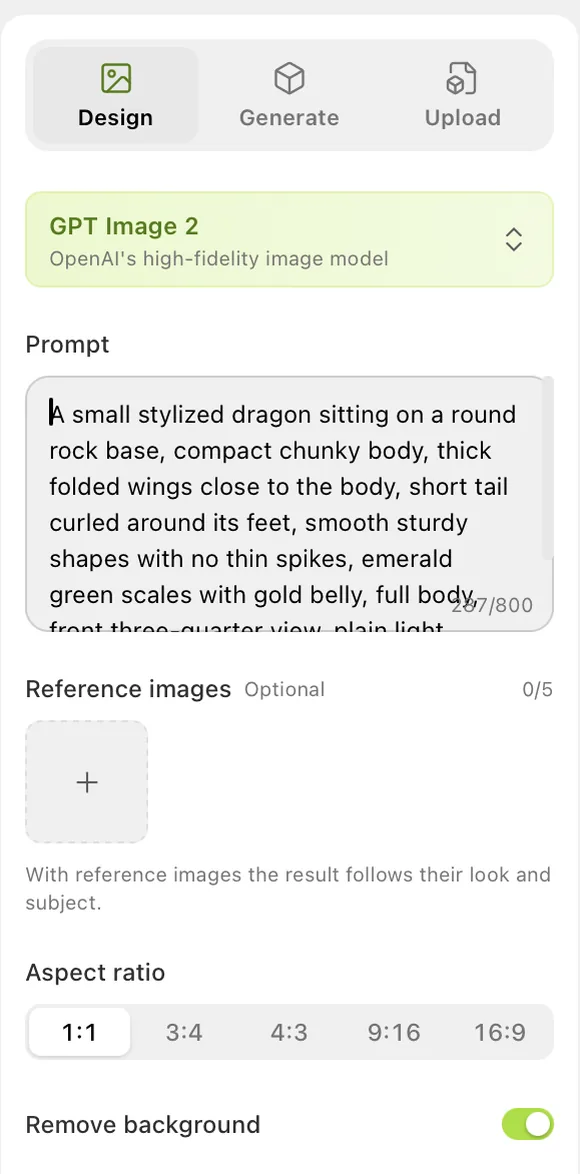
Design turns a description, and optionally reference images, into an image. You can then turn the image into a 3D model.
To design an image, follow these steps:
-
In the Meshy tab, click Design.
-
In Prompt, describe what you want to print. A prompt can be up to 800 characters.
-
Optional: Under Reference images, click Add reference image, and choose up to five images. With reference images, the result follows their look and subject. Each image can be a PNG, JPG, or WebP file of up to 20 MB.
-
Choose an image model, which can be GPT Image 2, Nano Banana Pro, Nano Banana 2, or Nano Banana.
-
Choose an Aspect ratio:
1:1,3:4,4:3,9:16, or16:9. -
Optional: Turn off Remove background. Images on a transparent background work better for 3D generation, so this option is on by default.
-
Click Design image.
When the image is ready, it appears in My creations.
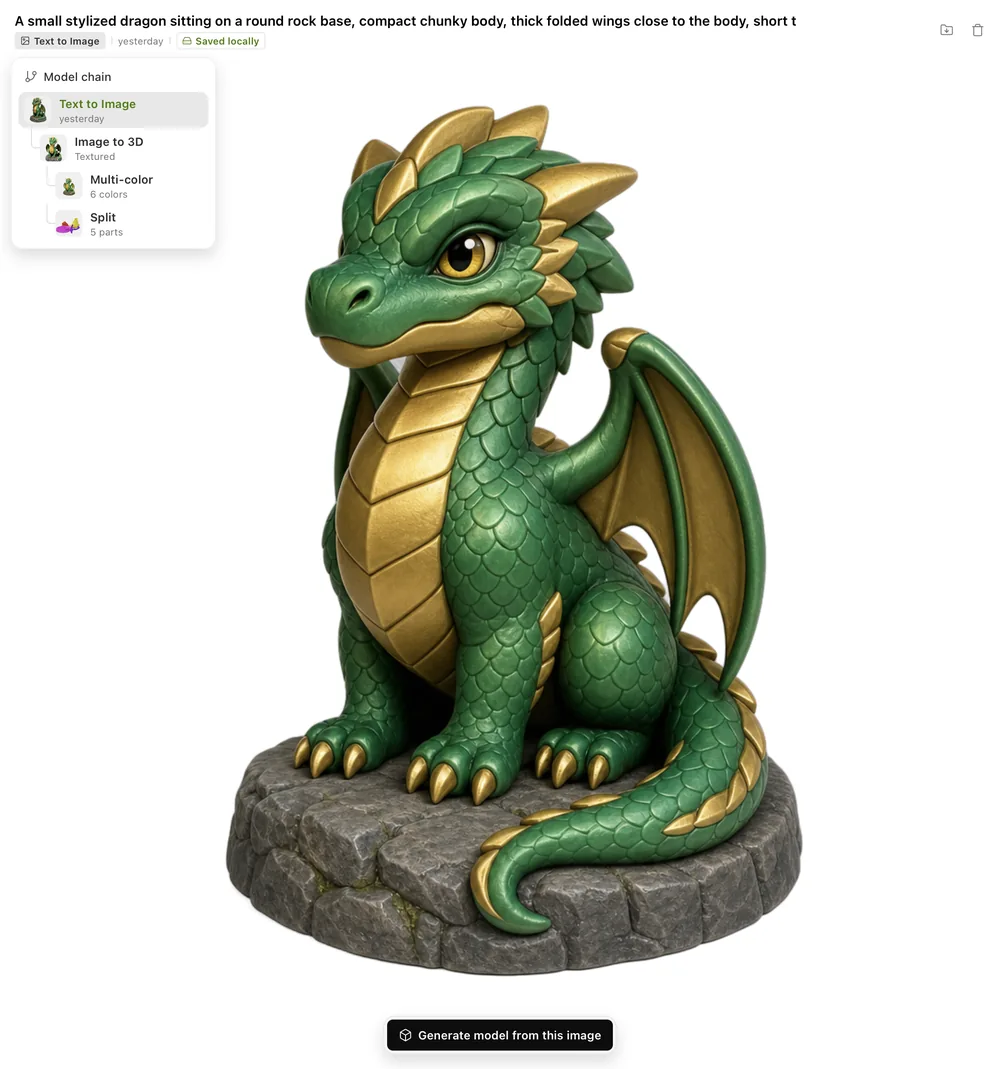
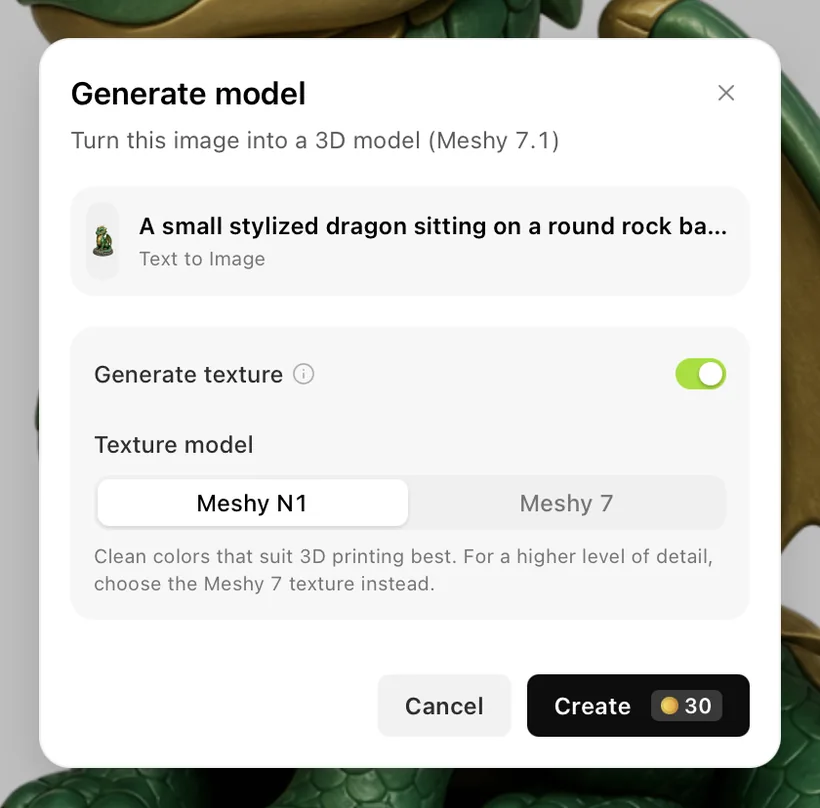
To start a 3D model from the image, click Generate model from this image. In the Generate model dialog, choose your texture options, and then click Create. The dialog opens with Generate texture on and Meshy N1 selected.
Generate a model
Generate turns one image, or up to four views of the same object, into a 3D model with Meshy 7.1. One image uses Image to 3D. Several views use Multi-Image to 3D.
To generate a model, follow these steps:
-
In the Meshy tab, click Generate.
-
Under Image, click to choose an image, drag one in, or paste one. The image can be a
.png,.jpg,.jpeg, or.webpfile of up to 20 MB. If you have no image yet, click No image yet? Design one first. -
Optional: To make the model more accurate, under More views, click Add a side or back view. Add up to three more views of the same object. The first image is the front view.
-
Choose how to texture the model:
- To get an untextured model, turn off Generate texture. You can texture the model later.
- For Texture model, choose Meshy N1 or Meshy 7. Meshy N1 gives clean colors that suit 3D printing best. Meshy 7 gives a higher level of detail, with a Resolution of 2K or 4K and an optional Texture prompt.
-
Click Generate model.
The model appears in My creations with its progress. When it finishes, select it to preview it in 3D.
Upload a model
Upload brings your own model into the tab, so you can check, repair, texture, or make a multi-color version of it.
To upload a model, follow these steps:
-
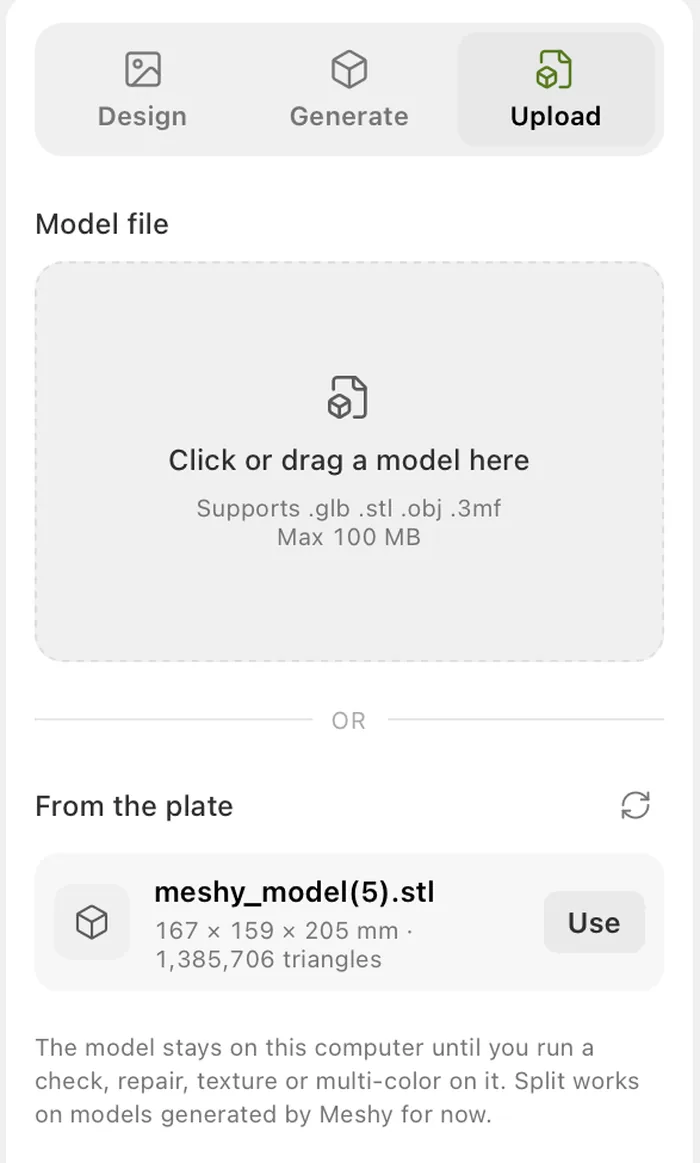
In the Meshy tab, click Upload.
-
Add a model in one of the following ways:
- Under Model file, click to choose a model file, or drag one in. A
.glbor.3mffile can be up to 100 MB. An.stlor.objfile can be up to 1 GB, because the plugin converts it to a much smaller model before it sends it to Meshy. The converted model must be 100 MB or smaller. - Under From the plate, click Use next to an object on the plate. If the list is out of date, click Refresh.
- Under Model file, click to choose a model file, or drag one in. A
-
Select the model in My creations, and then run a tool from the toolbar.
The model stays on your computer until you run a check, repair, texture, or multi-color on it. Versions of an uploaded model come back at its original size.
A model that comes from the plate has these limits:
- OrcaSlicer can't share painted colors with the plugin, so the plugin reads them from the
.3mffile the project was opened from. If it can't read them, the model comes in uncolored and the tab tells you. To keep the colors, save the project as a.3mffile and drop that file in Model file. - Modifiers and negative parts are left out.
Split works only on models that Meshy generated, so it's unavailable for an uploaded model.
Check and repair a model
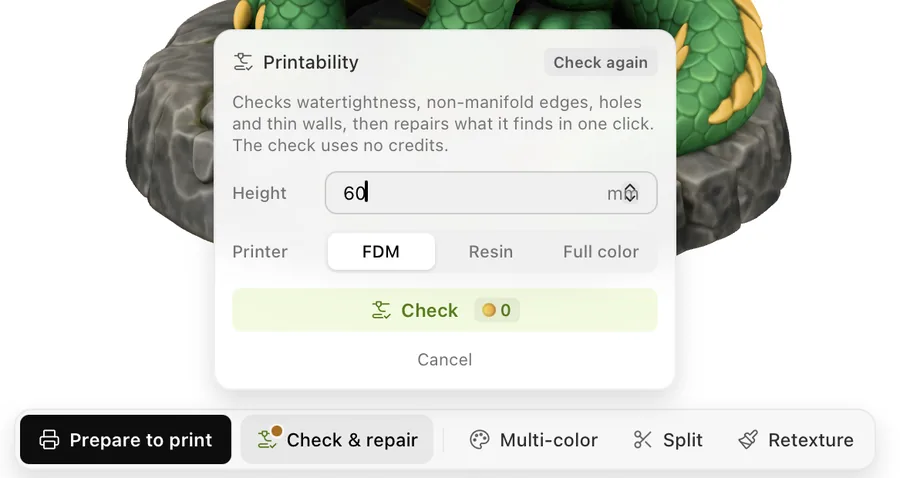
Check & repair looks for watertightness, non-manifold edges, holes, and thin walls. The check uses no credits. If it finds problems, you can repair them in one click.
To check a model, follow these steps:
-
In the Meshy tab, select a model.
-
In the toolbar, click Check & repair.
-
Enter the Height of the printed model in millimeters, and choose the Printer type: FDM, Resin, or Full color.
-
Click Check.
The result is one of Ready to print, Risky, or Needs repair. It lists Watertight, Non-manifold edges, Holes, and Thin walls. Thin walls shows the share of the surface that is thinner than a limit in millimeters. The following result is Risky because 0.9% of the surface is thinner than 1 mm.
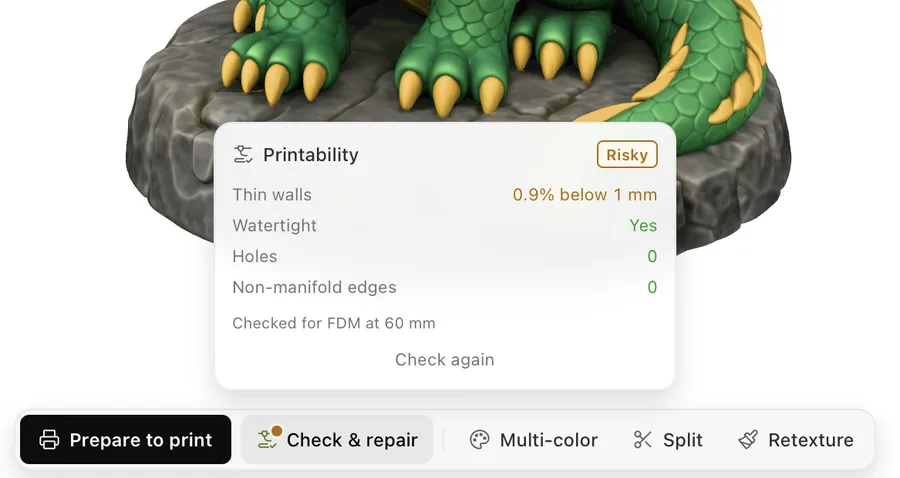
Repair appears when the check finds problems it can fix, such as holes, non-manifold edges, a model that isn't watertight, or severe thin walls. A model with only a thin-wall warning, like the preceding one, doesn't offer Repair.
To repair a model, click Repair. Repair spends credits, and the button shows the cost. It thickens thin walls and might slightly change fine details. The repaired model joins the model chain as a new version, and you can click Check again on it.
Repair changes the geometry, so a textured model loses its texture. For a textured model, the plugin first asks Repair this textured model? Click Repair to confirm. You can texture the repaired model again afterward.
Texture a model
To texture a model that has no texture, or to replace its texture, follow these steps:
-
In the Meshy tab, select a model.
-
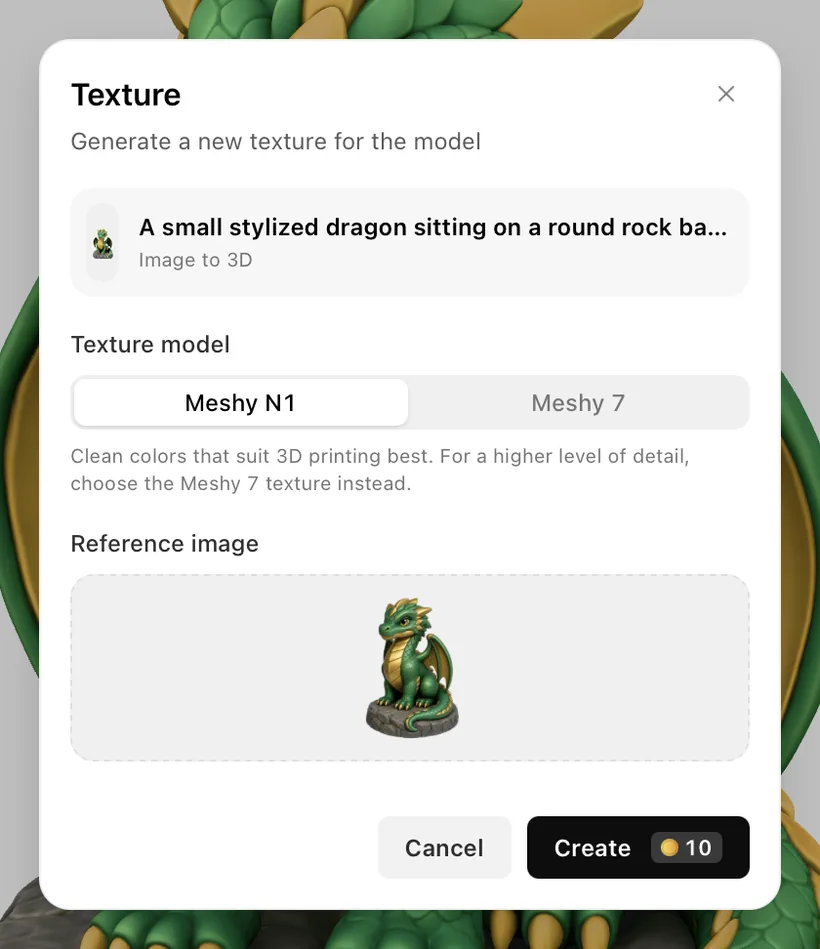
In the toolbar, click Texture. For a textured model, the button is Retexture.
-
For Texture model, choose Meshy N1 or Meshy 7, and then set the model's options:
- Meshy N1: under Reference image, add a front view image that sets the look of the texture. When the model came from an image, the dialog fills it in. Meshy N1 gives clean colors that suit 3D printing best.
- Meshy 7: choose a Resolution of 2K or 4K, and describe the texture in Texture prompt. Meshy 7 gives a higher level of detail.
-
Click Create.
The textured model joins the model chain as a new version.
Make a multi-color 3MF
Multi-color turns a model's texture into a 3MF file with one color region for each filament. Texture the model first, because the tool is unavailable for a model without a texture.
To make a multi-color 3MF, follow these steps:
-
In the Meshy tab, select a textured model.
-
In the toolbar, click Multi-color.
-
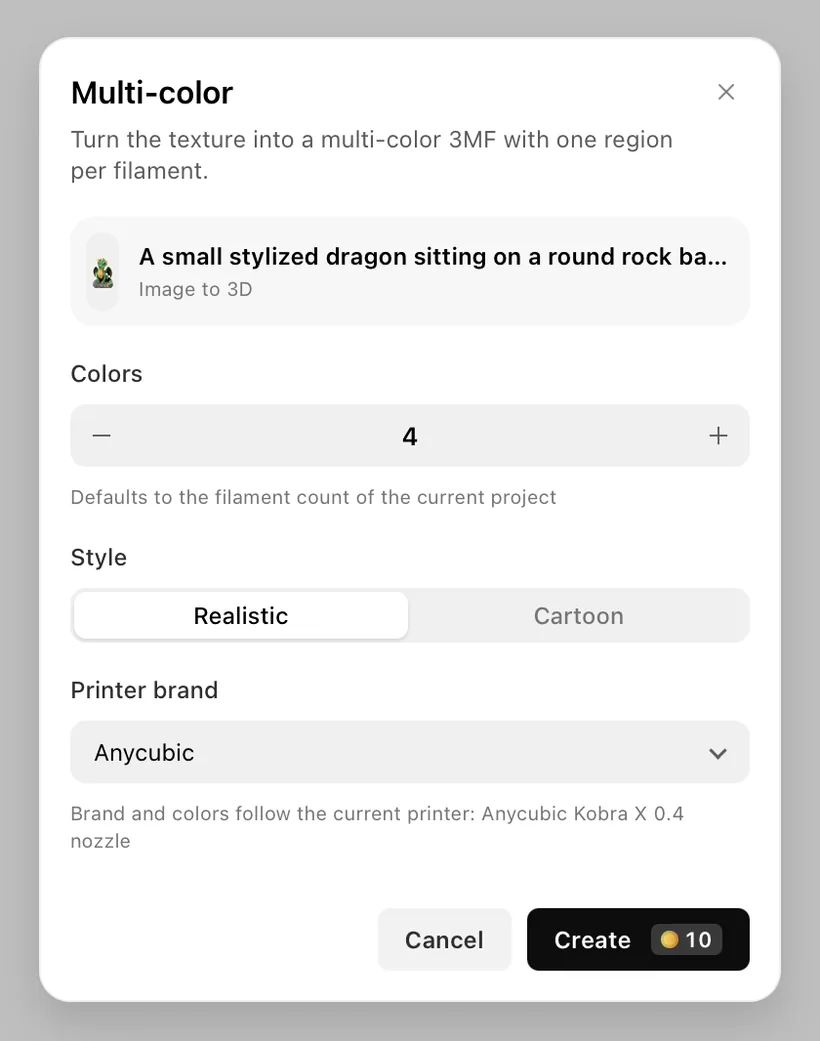
Set Colors to the number of filaments you want. It defaults to the filament count of your current project.
-
For Style, choose Realistic or Cartoon.
-
For Printer brand, choose your printer's brand. The dialog names your current printer and follows it for the brand and the colors.
-
Click Create.
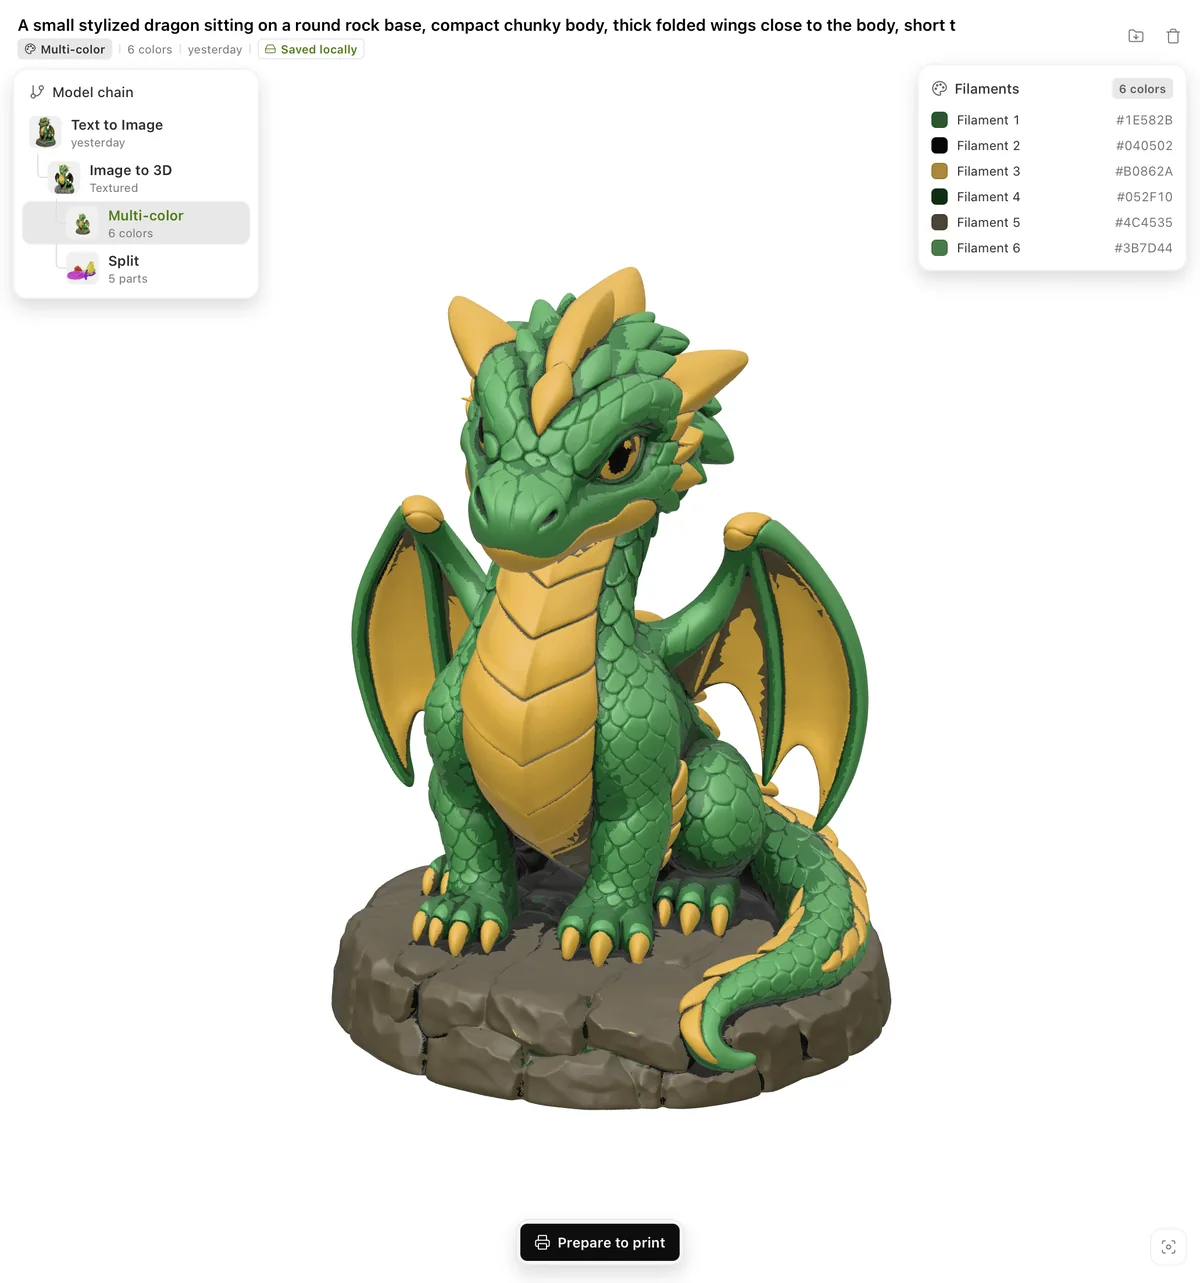
When the version is ready, the preview shows a Filaments card with each filament's color.
Split a model
Split cuts a model into parts that you print separately and assemble. It works on models that Meshy generated, not on uploaded models. It also needs the original result on Meshy, so it works within 3 days after the model finishes.
To split a model, follow these steps:
-
In the Meshy tab, select a model that Meshy generated.
-
In the toolbar, click Split.
-
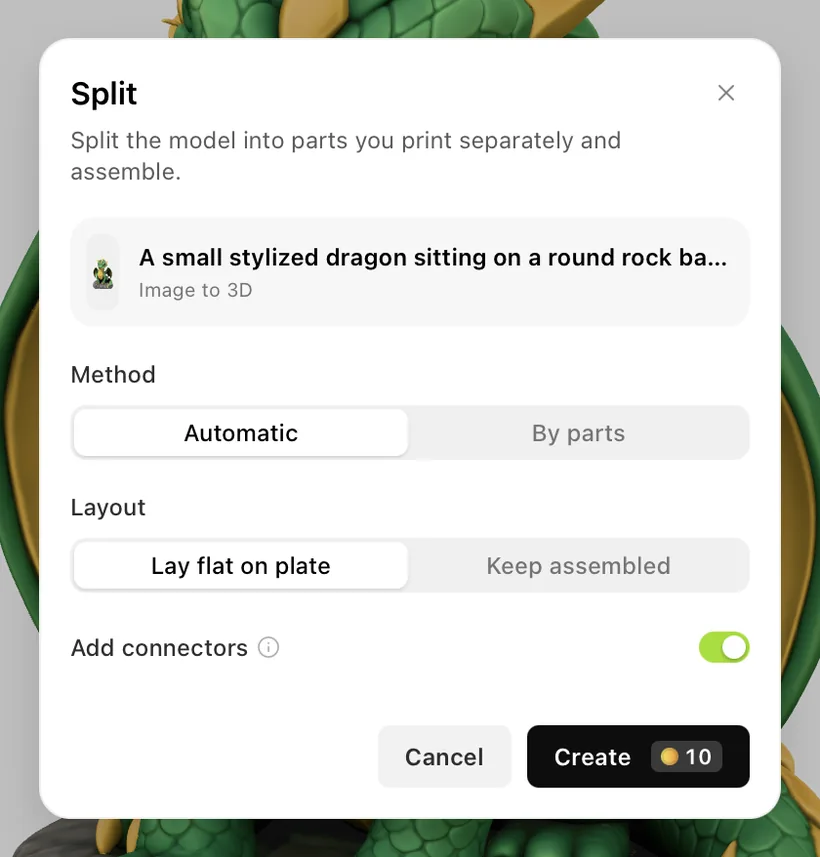
For Method, choose Automatic, or choose By parts and list the parts in Parts to split out, for example
head, body, arms, base. -
For Layout, choose Lay flat on plate or Keep assembled.
-
Optional: Turn off Add connectors. It's on by default, and connectors are pegs that make the parts easy to assemble after printing.
-
Click Create.
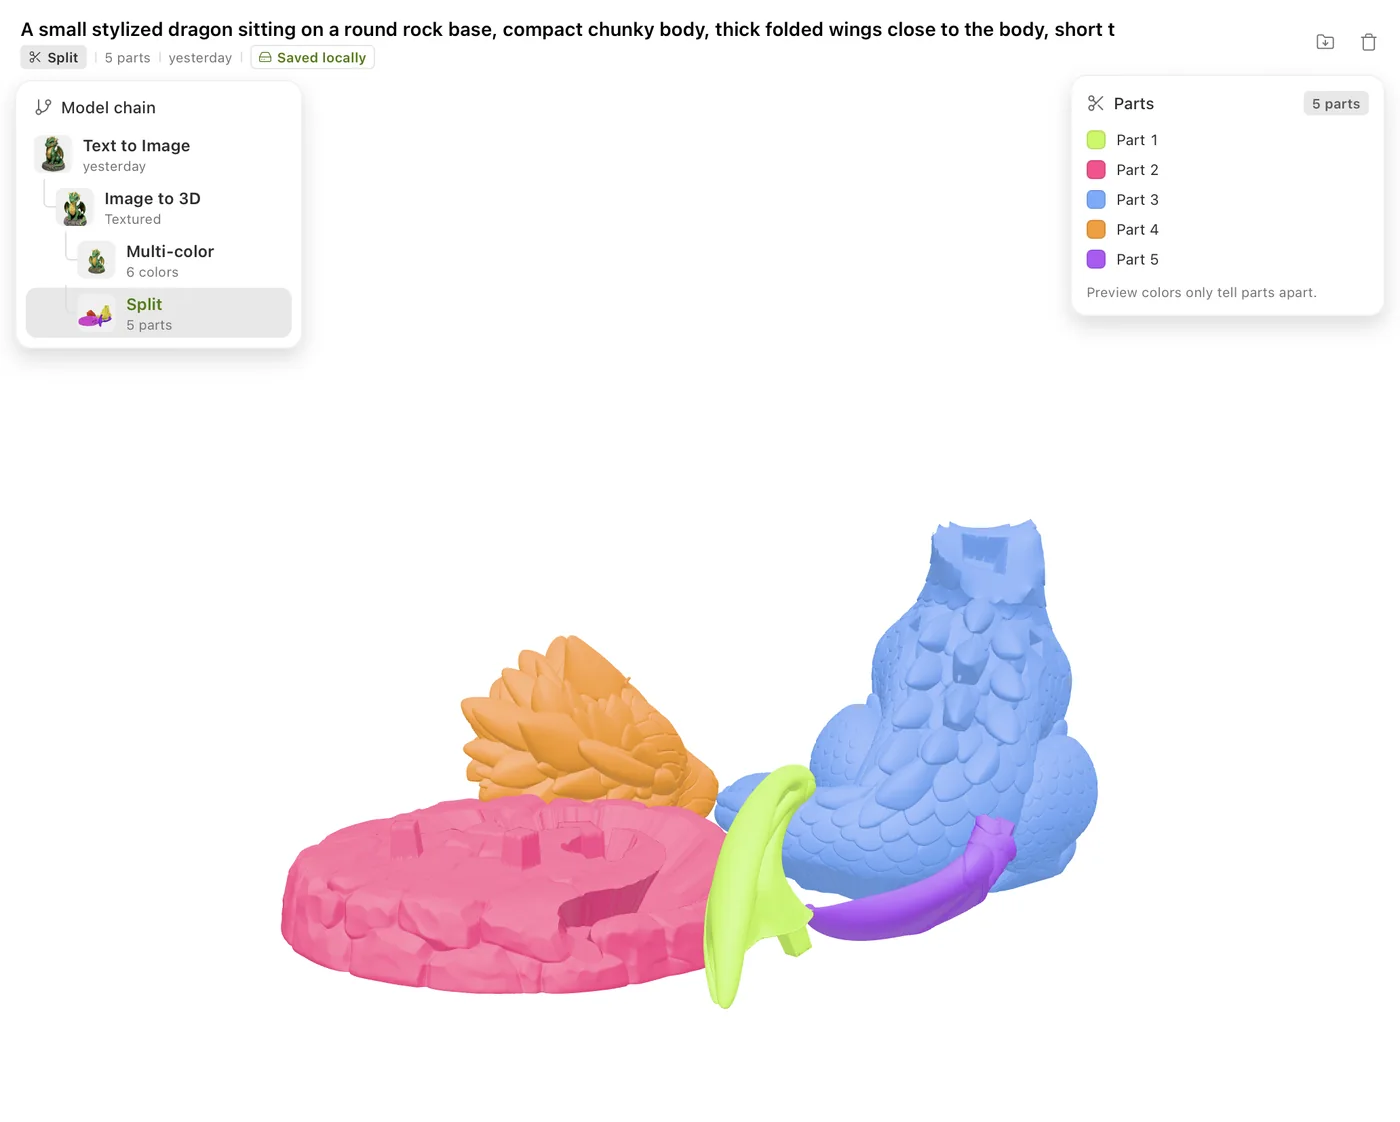
When the version is ready, the preview shows a Parts card. Its colors only tell the parts apart.
Add a model to the plate
To add a model to your project, follow these steps:
-
In the Meshy tab, select the version you want to print.
-
Click Prepare to print.
OrcaSlicer imports the model into the current project and opens the Meshy panel in Prepare. For an uploaded model, the button is Continue in Prepare. It only opens the panel, because the model is already in OrcaSlicer. When a model is ready, a notification in Prepare also offers Add to plate.
A few things to know about importing:
- An STL file from Meshy is at real-world scale, so a figure can be taller than your printer. Before the import, the plugin scales an STL file down to fit 80% of your printer's build volume. A model that already fits stays unchanged.
- OrcaSlicer keeps a copy of each imported model in its download folder, named
meshy_model.stl,meshy_model(1).stl, and so on. You can delete these files. - When you import a multi-color or split 3MF, OrcaSlicer might switch the active printer. Check the printer after the import.
- On Windows, OrcaSlicer opens an imported model in a new window unless only one instance is allowed. To import into the window you work in, turn on Preferences > Allow only one OrcaSlicer instance.
Save a copy
To keep a copy of a result outside OrcaSlicer, select it, and then click Save to Downloads. The plugin saves the copy in the meshy-for-orcaslicer folder in your Downloads folder:
- An image is saved as it is.
- A model is saved as an STL or OBJ file, at the size it goes onto the plate. Choose the format from the menu that opens.
- A multi-color or split result is saved as its 3MF file.
To open the folder, click Show in folder in the message that confirms the save.
Use the Meshy panel
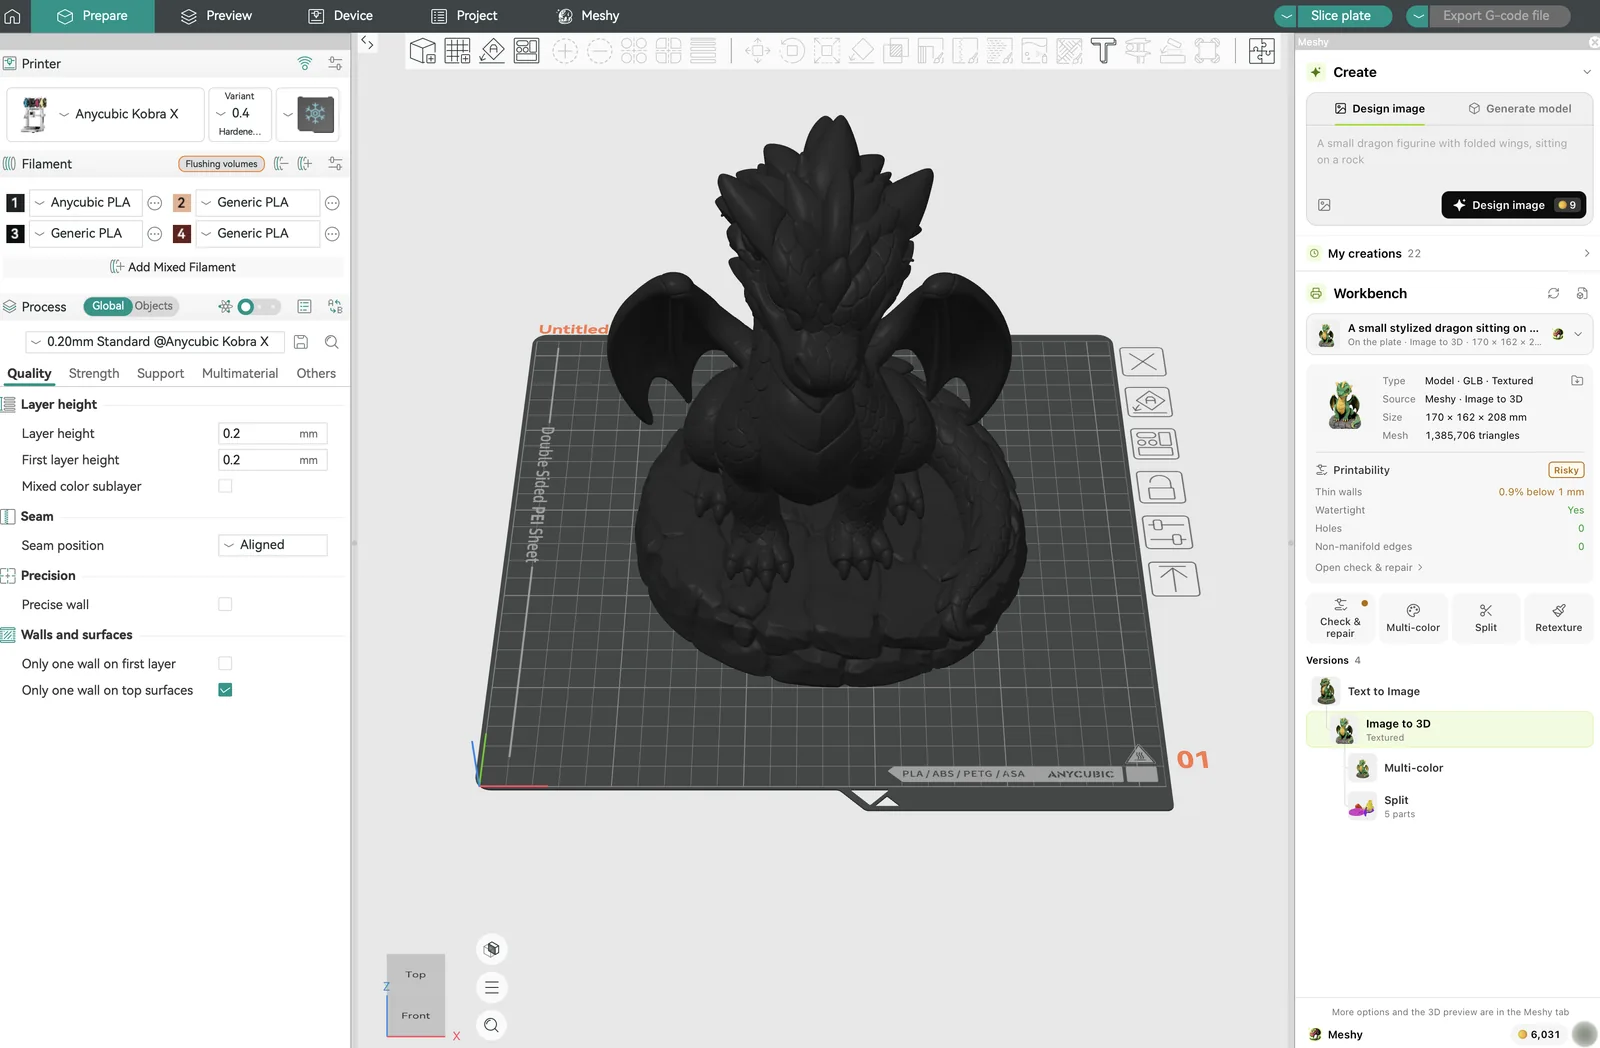
The Meshy panel is docked beside the plater in Prepare and Preview. It works on one model at a time, and you add the result to the plate from it.
To open the panel, do one of the following:
- In the left rail of the Meshy tab, click the panel button.
- In the Meshy tab, click Prepare to print.
- In OrcaSlicer, open Speed Dial by pressing Space, and then click Meshy Panel.
If you close the panel, a notification offers Reopen. If you leave the panel open, it reopens the next time you start OrcaSlicer. OrcaSlicer draws the panel's caption bar and close button, and the plugin can't change them.
The panel keeps everything on one page: Create at the top, My creations under it, and the Workbench for the model you're working on.
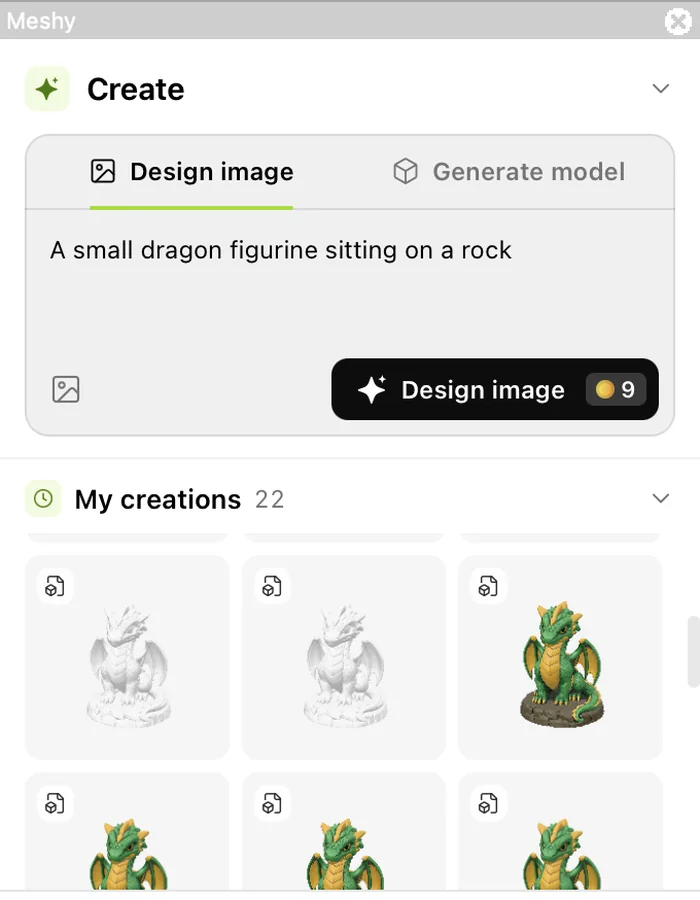
- Create: one box with two tabs. Design image makes an image from a description. To add reference images, click the image button. Generate model makes a model from one image, and you can add up to three more views. The Texture button turns texturing on or off. The panel always textures with Meshy N1.
- My creations: your results. A new creation appears first and opens in the Workbench, so you can follow its progress. Click a result to work on it.
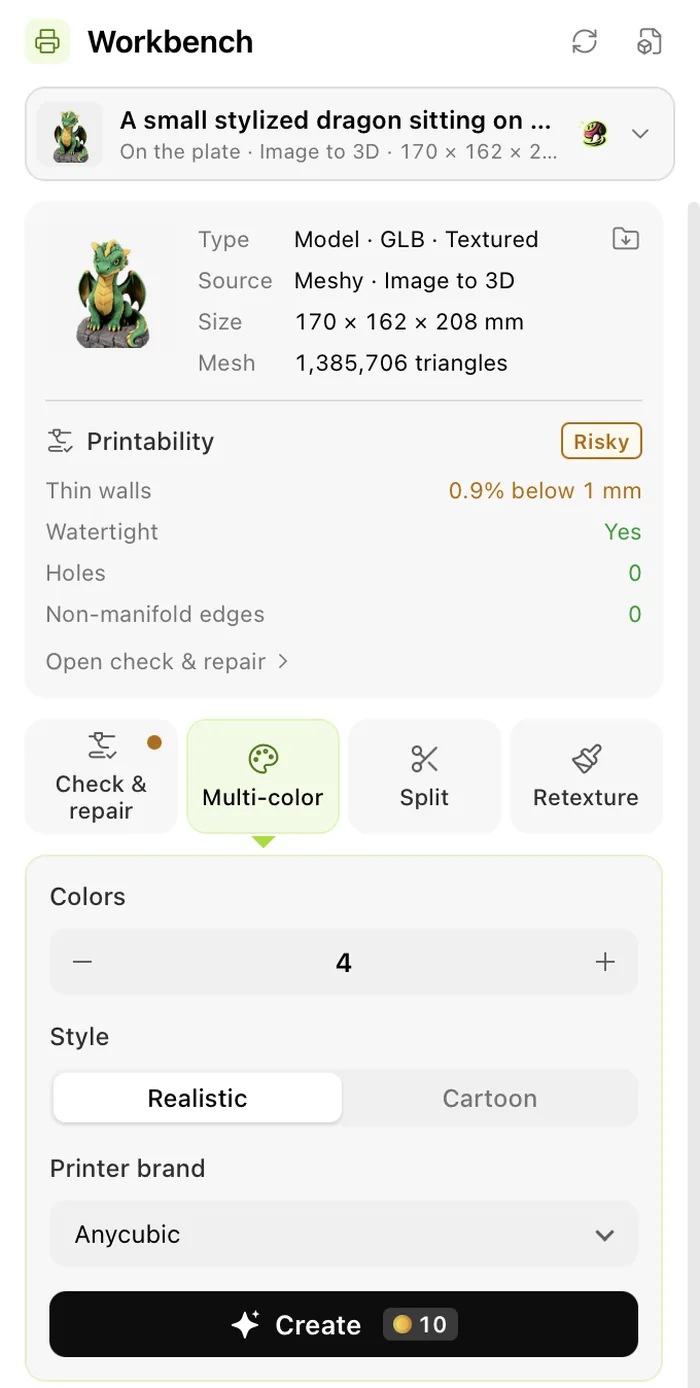
- Workbench: works on one model or image at a time.
- At the top, choose what to work on: an object on the plate, or the result you picked in My creations. With several objects on the plate, click the arrows to step through them. To work on a model file, click Open a model file.
- Below that, you see the type, source, size, and mesh, and the Printability of a model. To check it, click Open check & repair.
- For an image, click Generate model. For a model, click Check & repair, Multi-color, Split, or Texture (Retexture for a textured model). The options open right below the button, and you click Create to start.
- Versions shows each result under the one it was made from. Click a version to work on it.
- For a result that isn't on the plate yet, click Add to plate.
To fold Create or My creations away, click its heading. The panel leaves out the 3D preview and some options, such as Meshy 7 textures. For those, use the Meshy tab.
Saved results
Meshy deletes API results 3 days after they finish, except on Enterprise plans. To keep your work usable, the plugin downloads each finished result to your computer. The tab shows Saved locally on a saved result.
The tab previews, imports, and sends models again from the saved copies. When the copy on Meshy is gone, tools that take a model or an image send the saved file instead. Split can't, because it needs the original result on Meshy.
Removing a result from My creations deletes its saved copy. Saved results and uploaded models count toward the cache limit, which is 2 GB by default. To change it, click your avatar, and under Cache, choose 1, 2, 5, or 10 GB. Past the limit, the plugin deletes the oldest saved results first. It never deletes an uploaded model, because the upload is its only copy. A result that expired before the plugin saved it shows Expired.
The plugin keeps saved results and uploads in the plugin_data/meshy-orcaslicer/ folder inside OrcaSlicer's orca_plugins data folder. To open it, click your avatar, and then click Open folder. Updating the plugin keeps them. For more about retention, see Asset retention.
Plans and credits
Every action in the plugin needs a Pro plan or higher, including print checks. On a free account, an action shows Upgrade to keep creating. Click View plans to open the Meshy plans page in your browser.
Your credit balance appears in the left rail of the Meshy tab and in the footer of the Meshy panel. A button that spends credits shows its cost before you click it. The printability check uses no credits. If a task fails, Meshy refunds its credits automatically. For credit costs, see Pricing and credits.
Troubleshooting
The following table lists common problems, their causes, and how to fix them.
| Problem | Cause | Fix |
|---|---|---|
| Split is unavailable. | The model is an upload, or its original result on Meshy was deleted. | Generate the model again with Meshy, and split it within 3 days. |
| Multi-color is unavailable. | The model has no texture, or the plugin couldn't read its painted colors. | Texture the model first. For a plate object, save the project as a .3mf file and drop that file in Upload. |
| A result shows Expired. | Meshy deleted the result before the plugin saved it. | Generate it again. |
| An object from the plate comes in uncolored. | OrcaSlicer can't share painted colors with the plugin. | Save the project as a .3mf file, and drop that file in Upload. |
| The tab shows No reply from Meshy. | The request might have gone through without a reply. | Check My creations before you try again, so you don't pay twice. |
| An image or model is rejected. | An image must be PNG, JPG, or WebP and 20 MB or smaller. A model must be .glb, .stl, .obj, or .3mf. A .glb or .3mf file can be up to 100 MB, and an .stl or .obj file up to 1 GB if it converts to 100 MB or smaller. | Convert or shrink the file, and add it again. |
| OrcaSlicer didn't pick up the model. | The import didn't reach OrcaSlicer. | Click Prepare to print again, or restart OrcaSlicer. |
Next steps
-
To learn how to prepare a model for printing, see 3D printing workflow.
-
To split a model in the Meshy web app, see Auto split.