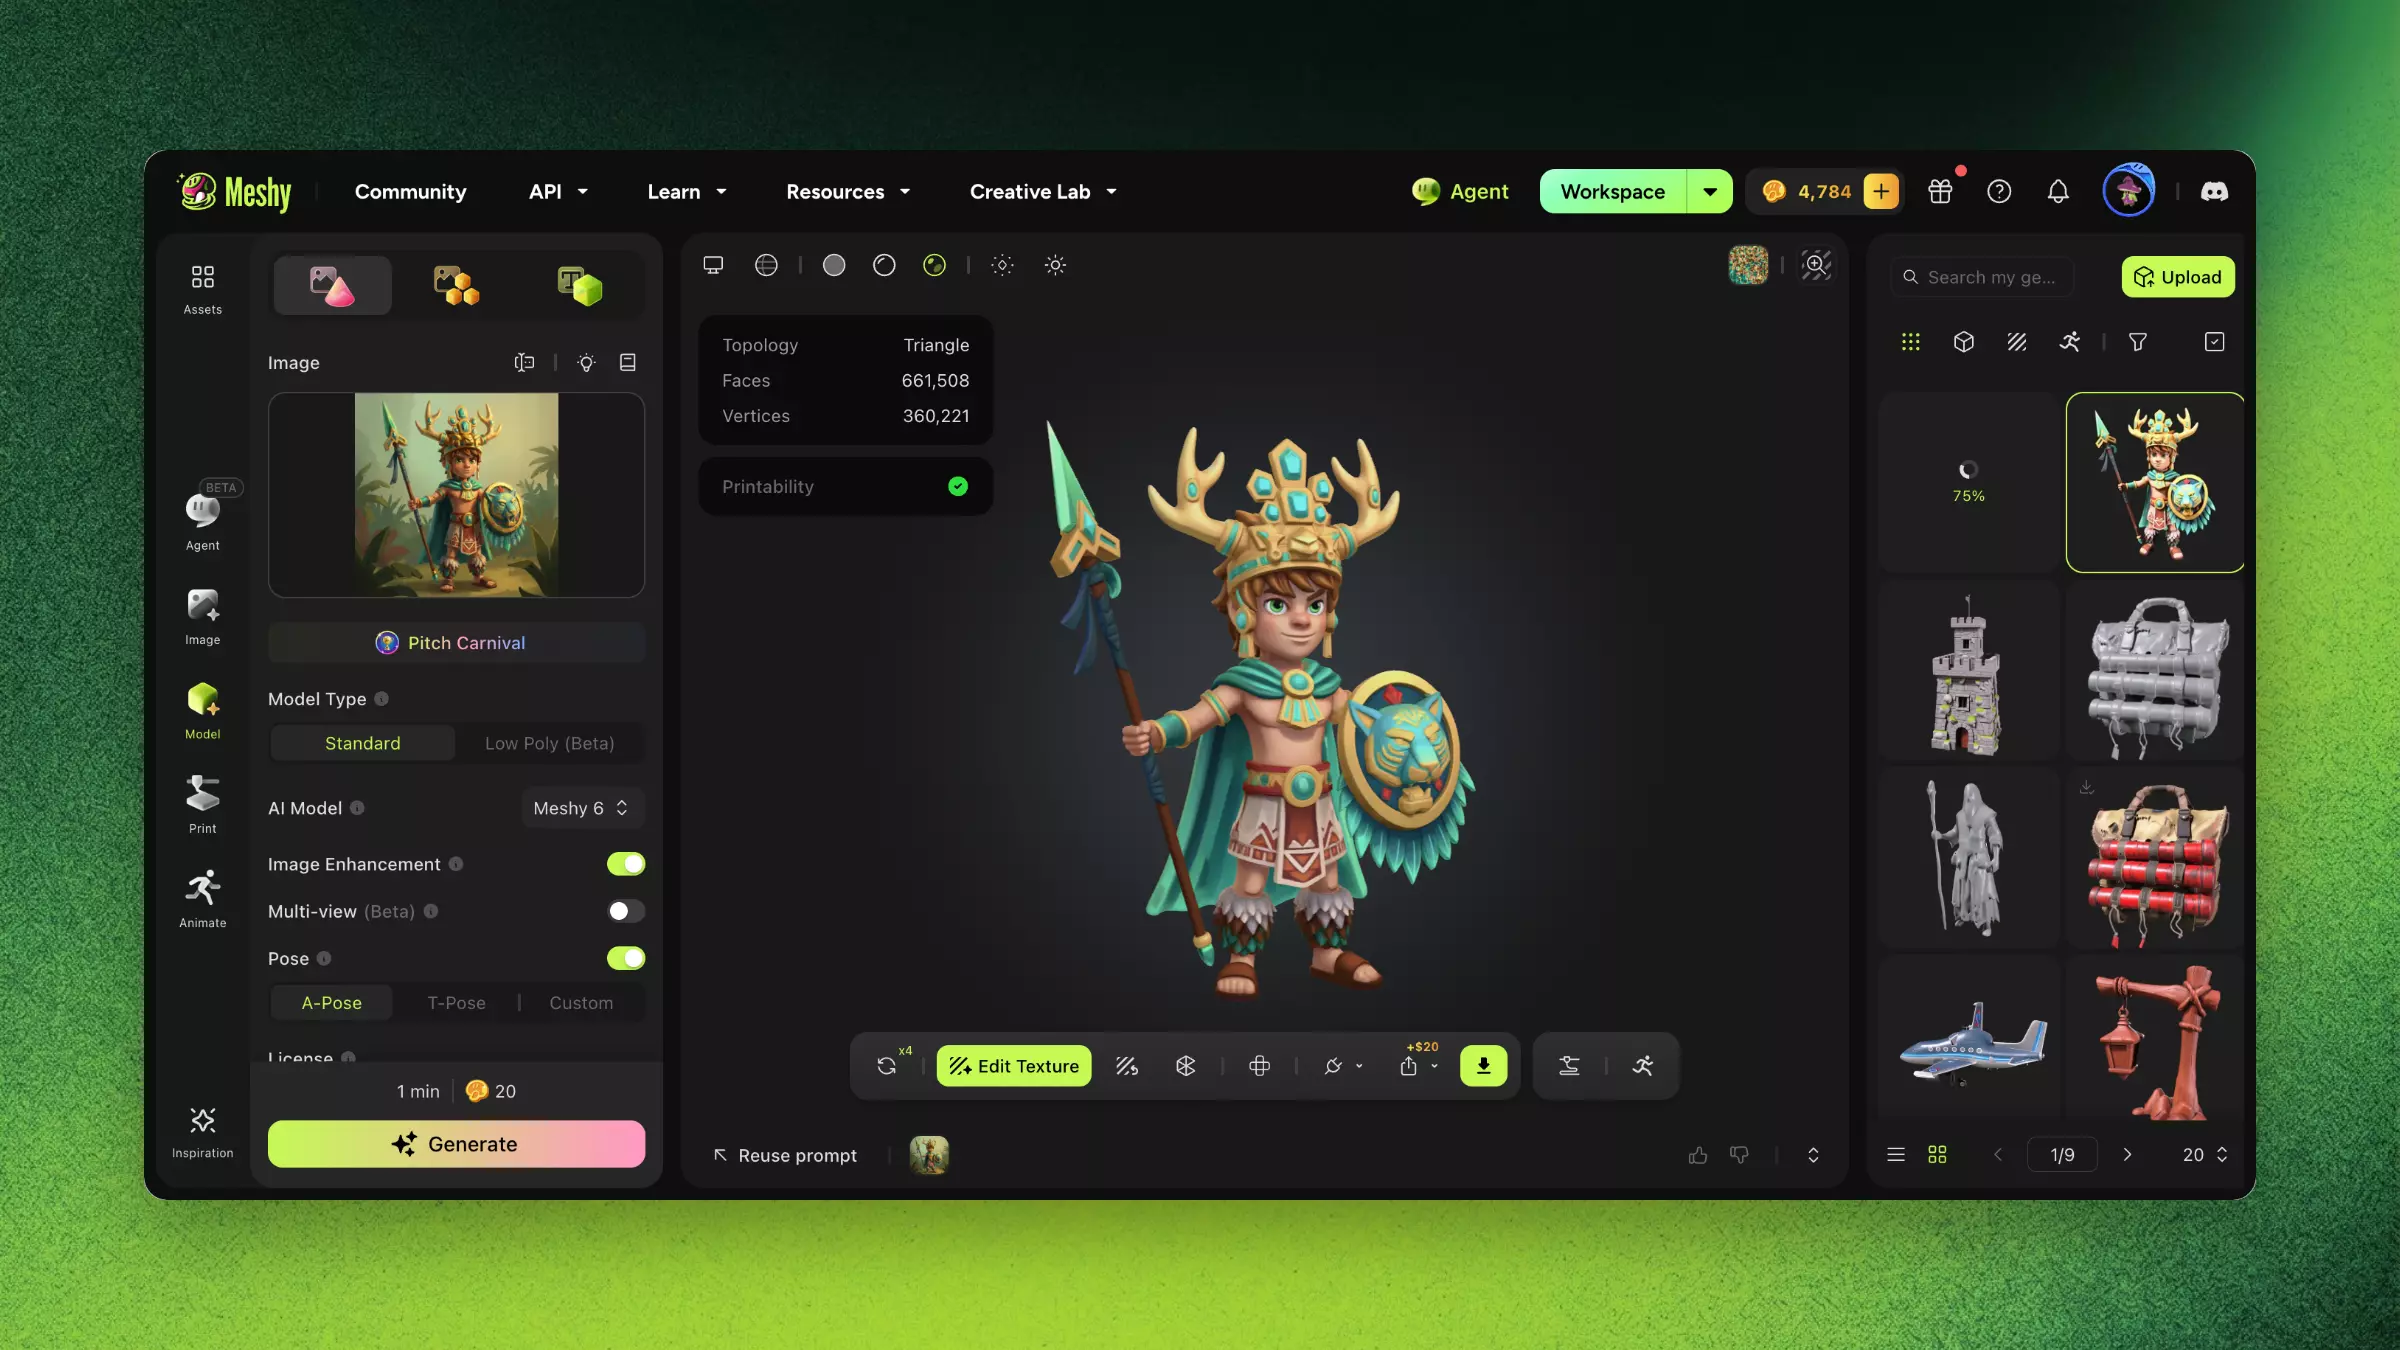
Image to 3D
Upload an image and Meshy's AI generates a textured 3D model that matches your visual reference — more precise than text prompts alone.
TL;DR
-
Upload an image, and AI generates a corresponding 3D model with textures.
-
Two model types: Standard for maximum detail and Smart Topology for optimized, game-ready meshes.
-
Rich control parameters: Image Enhancement, Multi-view Images to 3D, Pose control.
-
More precise than Text to 3D — a visual reference gives AI a clear generation target.
-
License options: CC BY 4.0 (Free plan) or Private (Pro and above).
When to Use
-
You have concept art, photos, or hand-drawn sketches to convert to 3D.
-
You need to precisely match a specific visual design.
-
You want optimized, game-ready assets for real-time or web 3D.
When NOT to Use
-
You have no reference image → Use Text to 3D or generate a reference with AI Image Generation.
-
You want to brainstorm what to create first → Use 3D Agent.
-
You have multi-angle photos for high-fidelity reconstruction → Use Multi-view Images to 3D.
Step-by-Step
-
Navigate to 3D Model module → Image to 3D.
-
Upload your image:
-
Supports JPG, PNG formats.
-
Recommended: clear subject, simple background, resolution ≥ 512×512.
-
For complex backgrounds, use AI Background Removal first.
-
-
Select Output Quality: Standard (high detail) or Smart Topology (optimized for games and real-time).
-
Configure parameters:
-
Multi-view: Generate a more complete 3D model from multiple images at different angles.
-
Pose Control: Specify the pose for the generated model (humanoid models).
-
Image Enhancement: Enable to let AI improve input image quality.
-
-
Click Generate and wait (~1 minute).
-
Rotate and review the result in the 3D previewer from all angles.
-
Proceed to post-processing or download.
Smart Topology
Smart Topology is a generation mode built for real production pipelines: game development, real-time rendering, and web-based 3D. Instead of a dense, uniform mesh, it outputs clean, organized geometry that's ready to work with right away.
What you get:
-
Native part segmentation: the model comes split into clean, accurate parts, so you can select, re-texture, or animate each piece on its own instead of wrestling with one fused mesh.
-
Fast iteration: about 10 seconds from image to mesh, quick enough to try several versions in one sitting.
-
Full poly-count control: set a target anywhere from 100 to 15,000 polygons, from lightweight web and mobile assets to more detailed real-time models.
Why it matters:
-
Cleaner topology deforms more predictably, so rigging and animation behave better.
-
A controllable, low poly count keeps assets light enough to drop straight into your engine without a performance hit.
-
Segmented parts make downstream edits, like swapping a material or adjusting one component, far easier.
Choose Standard instead when you want maximum surface detail for renders or showcases and topology isn't a constraint.
Multi-view Images to 3D
Upload multiple images from different angles, and AI combines all viewpoints to generate a more complete 3D model.
-
Recommended angle combinations: Front + Side + Back + 3/4 view
-
Consistency requirement: All images should be of the same object, with similar lighting conditions
-
Advantage: Back and side details are more accurate, reducing AI "guesswork"
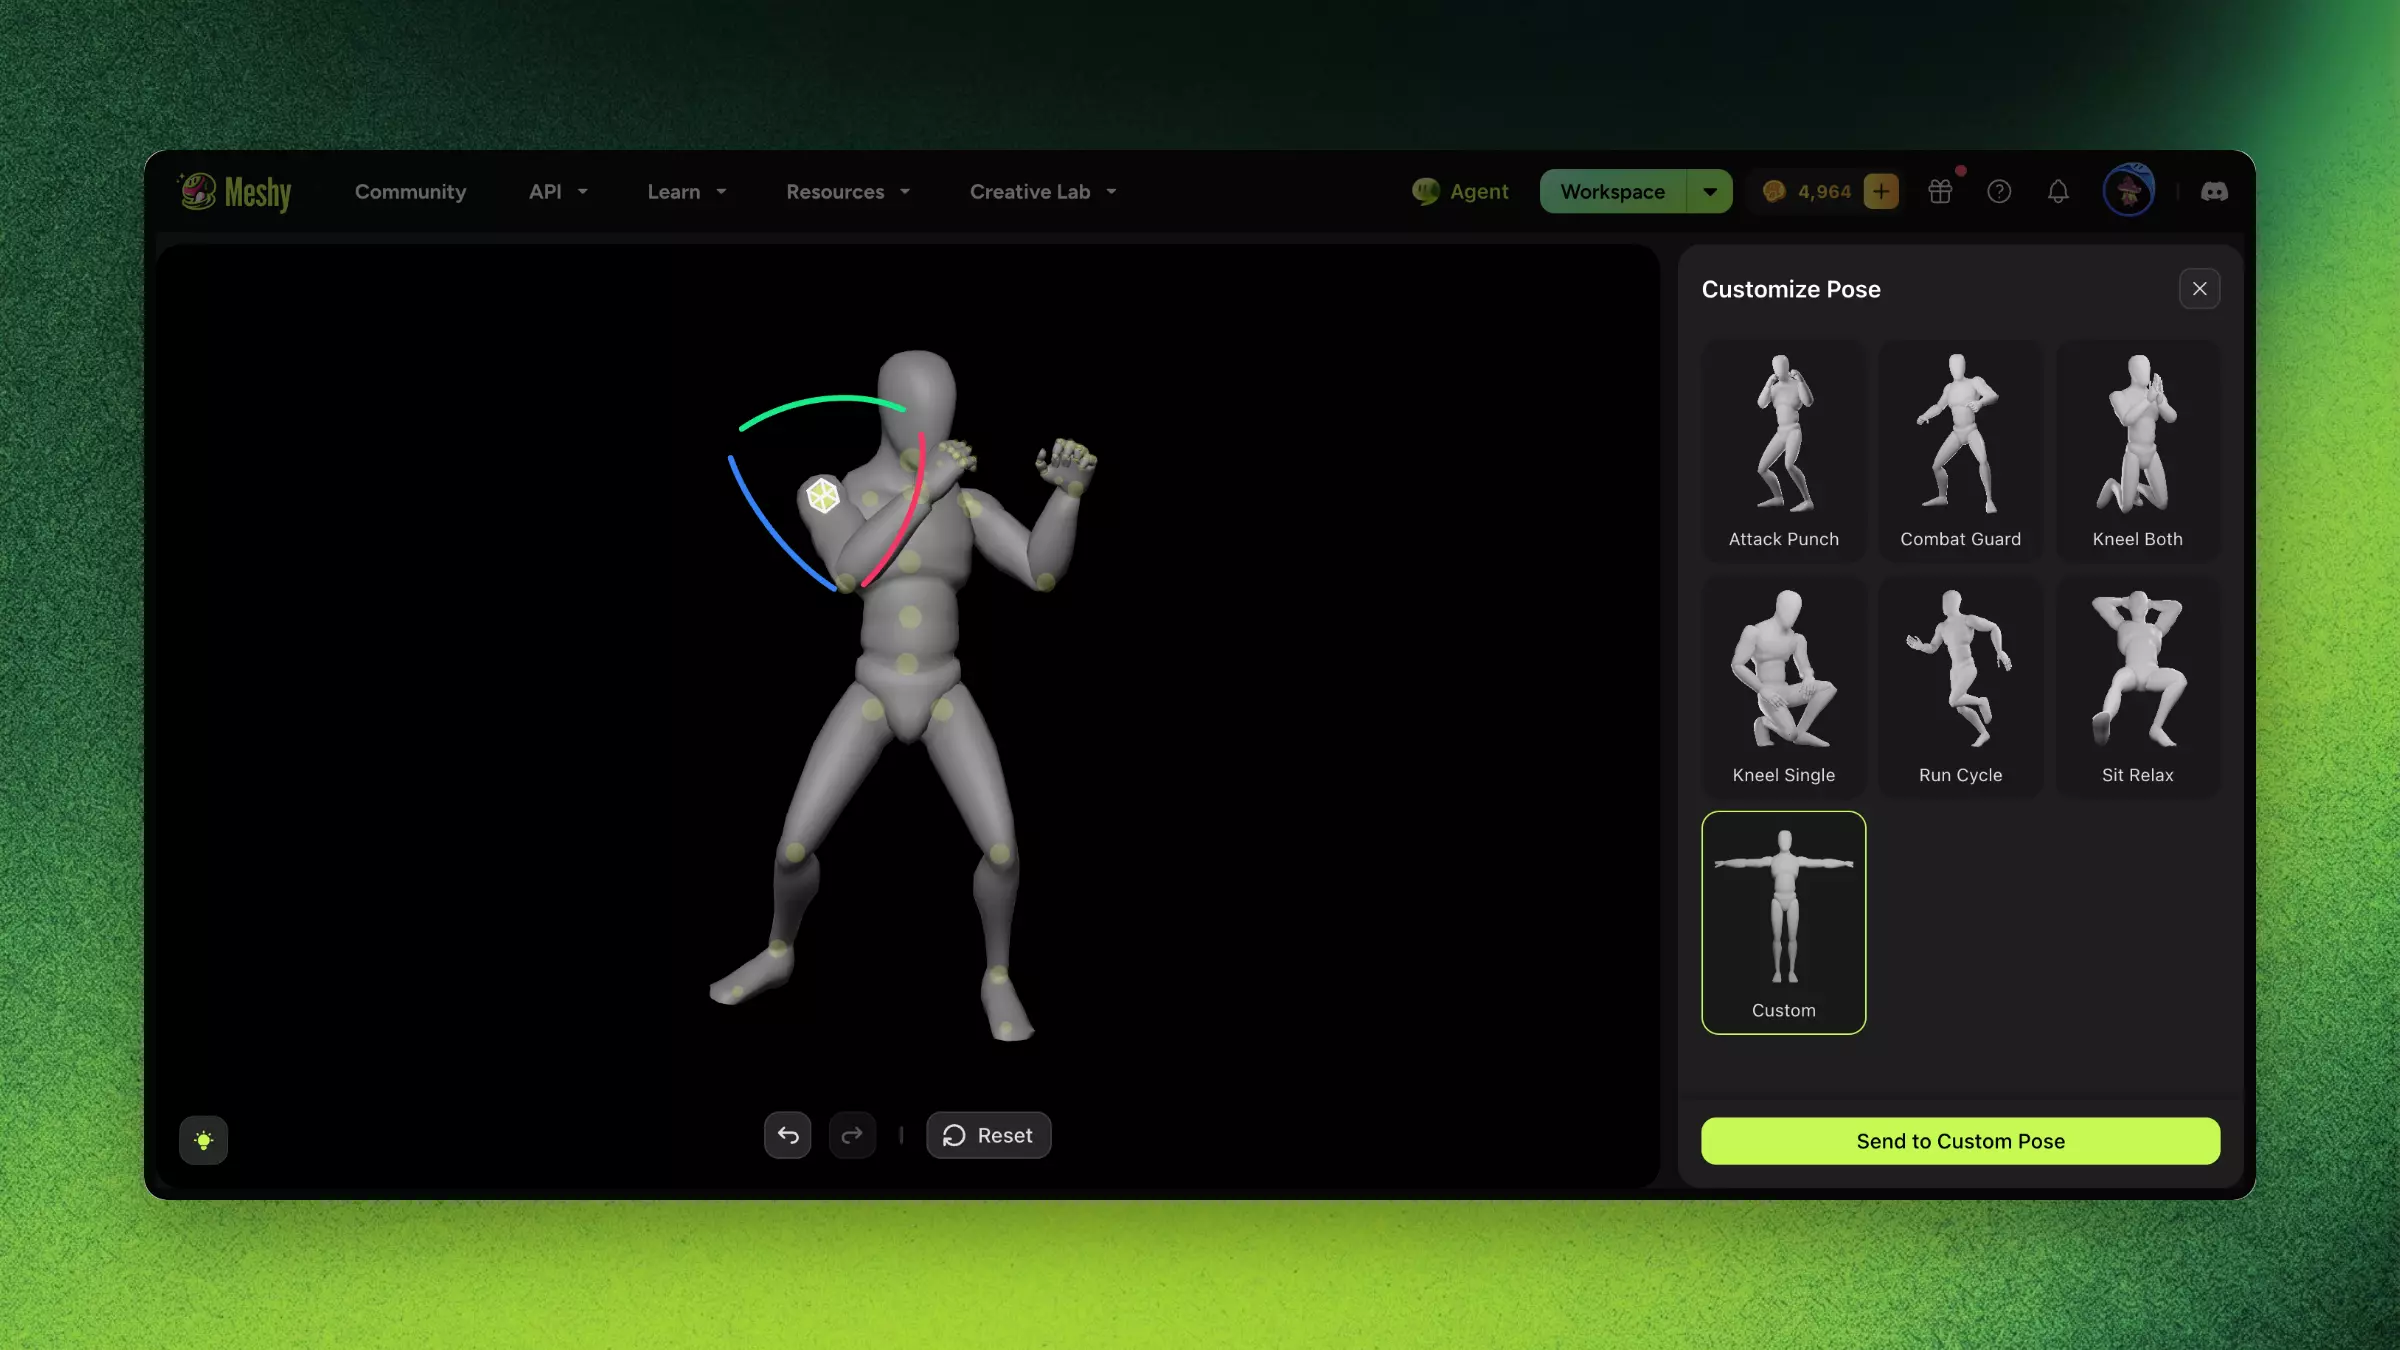
Custom Pose
Take full control of your 3D character's pose during generation. Instead of relying on the default pose from the input image, you can define the exact stance your character will be created in.
How it works:
-
Upload a character image.
-
Select Pose → Custom Pose.
-
Choose from 6 preset poses as a starting point, or manually adjust every joint (drag, rotate, refine) for total control.
-
Click Generate — the character will be created in the exact pose you set.
When to use Custom Pose:
-
You need a specific pose for your project (action stance, sitting, T-pose for rigging) but your reference image shows a different pose.
-
You want to generate the same character in multiple poses without re-uploading different reference images.
-
You need a T-pose or A-pose output for downstream rigging in Animate, but your concept art shows a dynamic pose.
Tips:
-
For best results with Animate (auto-rig + animation presets), set the pose to T-pose or A-pose.
-
Custom Pose applies to humanoid characters. Non-humanoid subjects use the pose as shown in the input image.
Settings & Tradeoffs
| Setting | Options | Tradeoff |
|---|---|---|
| Model Version | Meshy 6 / Meshy 5 | Same as Text to 3D |
| Output Quality | Standard / Smart Topology | Standard has more detail; Smart Topology is better for real-time rendering |
| Image Enhancement | On / Off | On: AI pre-processes to improve image quality; Off: preserves original, best for high-quality inputs |
| Multi-view | Single / Multiple (2–8) | Multiple is more accurate but requires prepared materials |
| Pose Control | Default / Custom | Custom pose is ideal for character-type models |
| License | CC BY 4.0 / Private | CC BY 4.0: Free plan. Private: Pro+, full commercial use |
Examples
Success Example:
-
Input: Clear front-view photo of a sneaker on white background, Meshy 6, Standard.
-
Result: Accurate 3D sneaker with correct proportions, detailed sole pattern, clean textures.
Failure Example:
-
Input: Full scene photo with multiple objects, cluttered background.
-
Result: AI merges multiple objects into one distorted mesh.
-
Fix: Crop to a single object, remove background, use a clean reference.
Troubleshooting
| Symptom | Cause | Fix |
|---|---|---|
| Back details missing or incorrect | Single image provides no back info | Use Multi-view Images to 3D with back-angle references |
| Model proportions distorted | Severe perspective distortion in photo | Use photos with near-orthographic projection or telephoto lens |
| Generation ignores image details | Image resolution too low | Enable Image Enhancement or provide a higher-resolution input |
| Black patches on model surface | Input image has shadows or dark areas | Use evenly-lit photos, or correct lighting in a 2D editor first |
FAQ
- How do I convert a photo into a 3D model?
- Open 3D Model → Image to 3D, upload a clear image, select Meshy 6, configure options, and generate in about 1–2 minutes.
- What image works best for Image to 3D?
- A clear single subject on a simple background at 512×512 or higher; remove busy backgrounds first for the best accuracy.
- Is Image to 3D more accurate than Text to 3D?
- Yes. A visual reference gives the AI a clear target, so Image to 3D matches your design more precisely.
- Can I generate a model in a specific pose?
- Yes. Use Custom Pose to pick from 6 presets or adjust joints manually — set a T-pose or A-pose for downstream rigging.
- Can I use multiple photos of the same object?
- Yes. Multi-view Images to 3D combines front, side, back, and 3/4 views for a more complete, accurate model.