快速開始
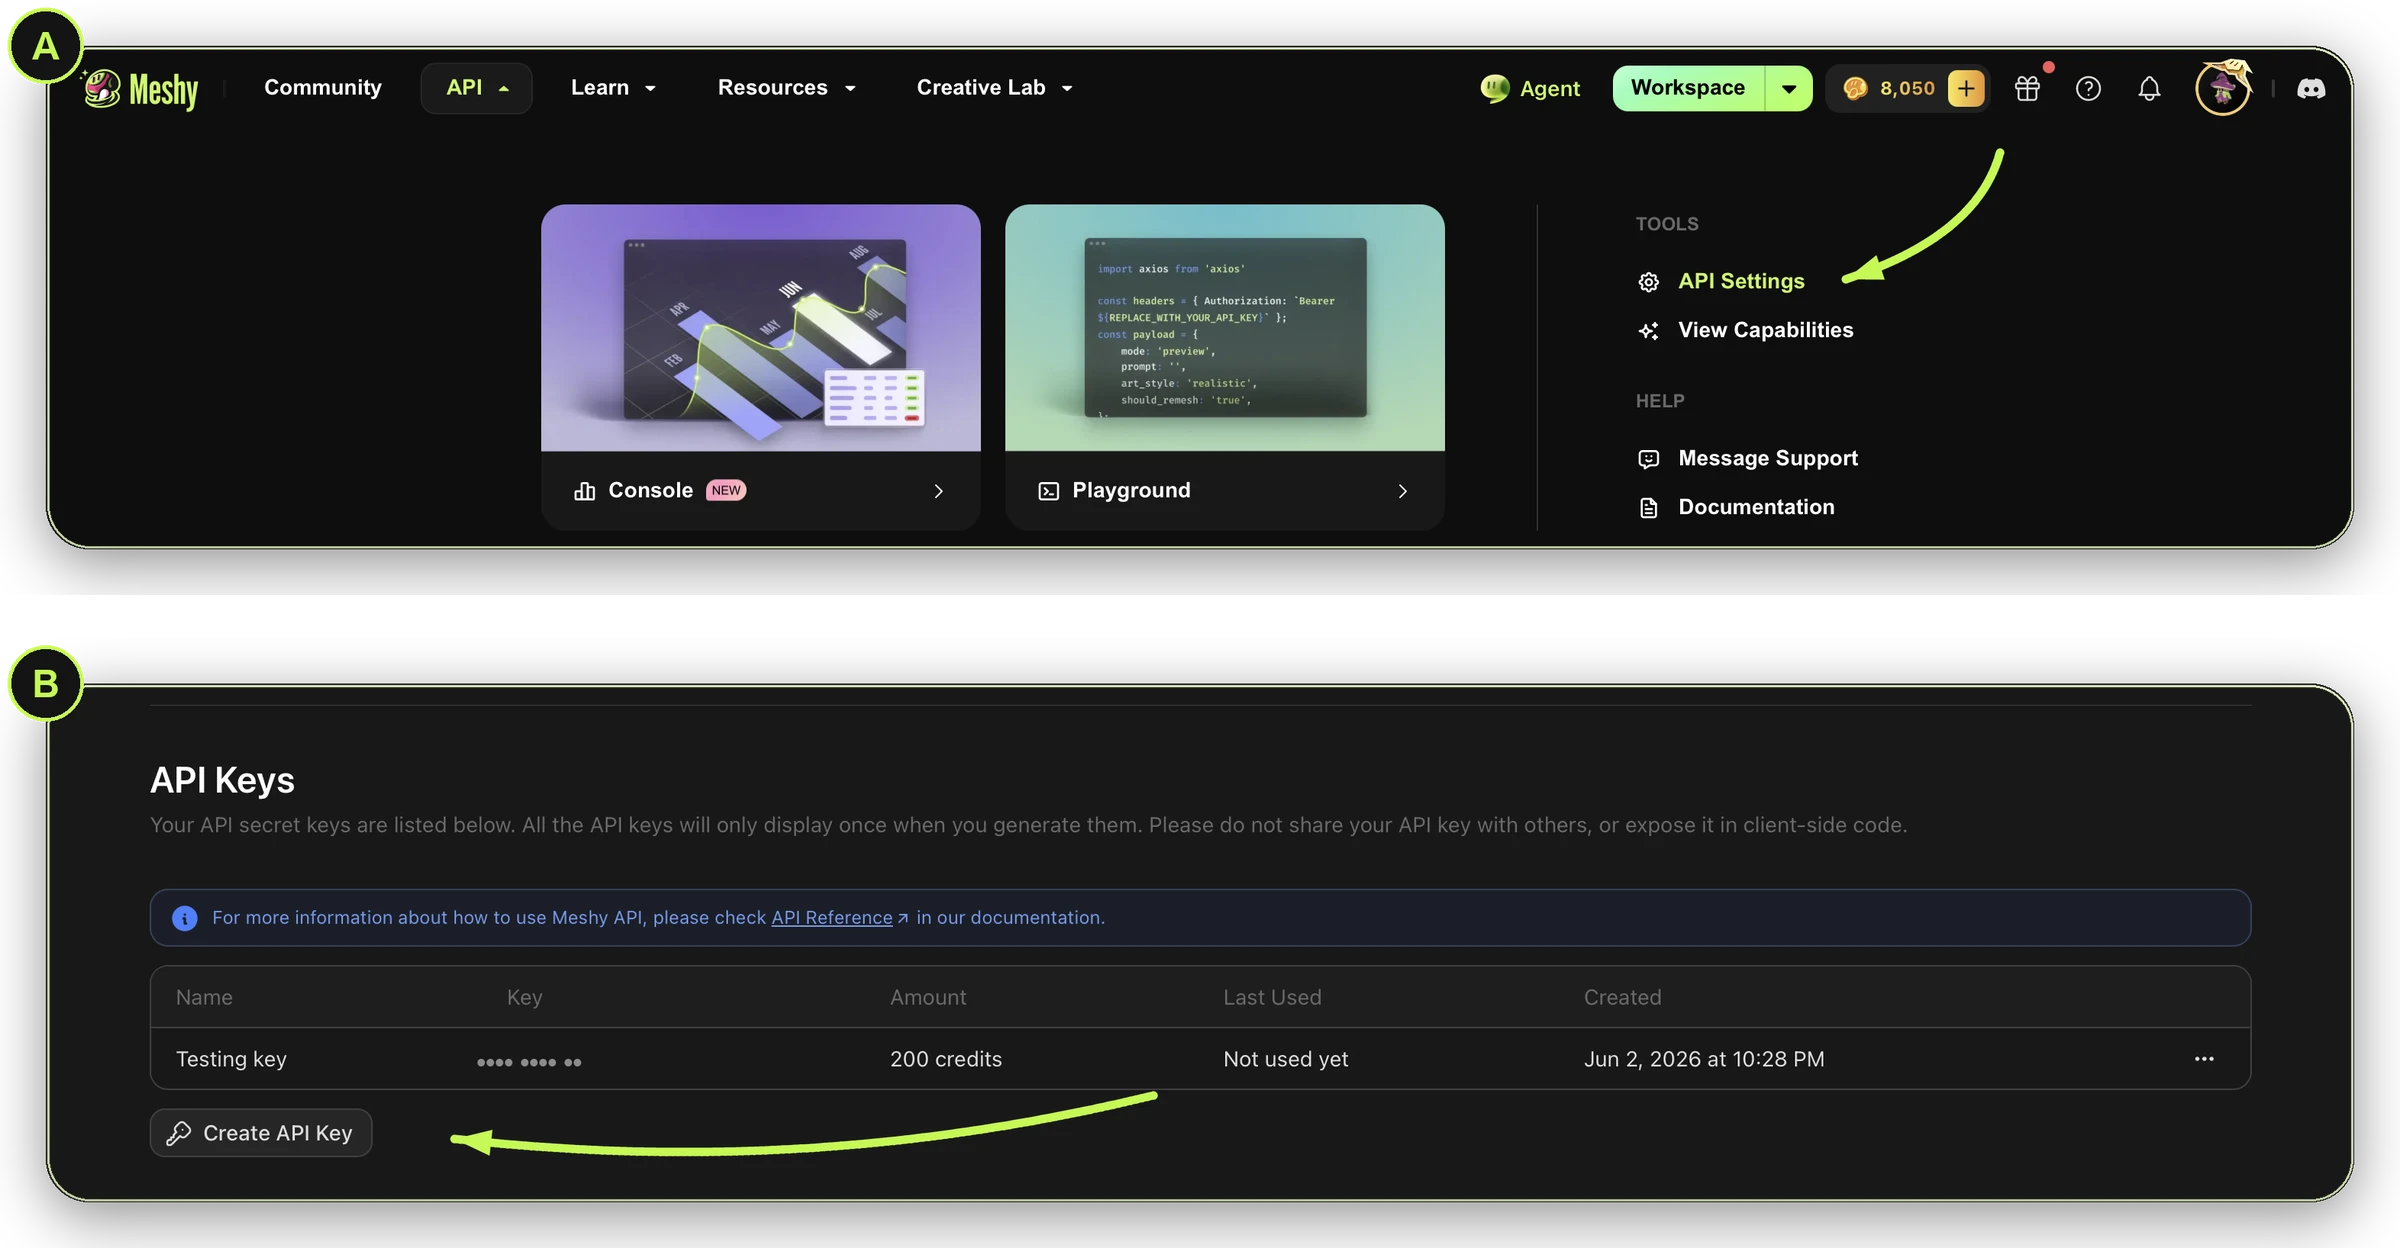
從建立你的 API key 開始
本指南中的每個請求都需要一個 API key。建立一個金鑰只需幾秒鐘。
建立你的 API key使用 Meshy REST API,只需四個步驟即可建立你的第一個 3D 模型。
1取得您的 API key
在開發者平台的 API Keys 頁面中建立一個 API key——離開此頁面後您將無法再次查看它,因此請妥善保存。每個請求都透過 Authorization 請求標頭中的 Bearer token 進行身份驗證——參見Authentication。
建立和管理 API key 需要付費方案。免費帳號會取得一個專用的內建金鑰,用於在 Playground 中測試,但無法建立或管理自己的金鑰。
安全提示: 避免將您的金鑰直接貼到腳本中——請將其儲存為環境變數:export MESHY_API_KEY="msy_..."。
2發起你的第一個 Image to 3D 請求
匯出你的金鑰,然後使用 Image to 3D 建立你的第一個任務。如果你想使用文字 prompt 或多張照片作為輸入?請參閱 Text to 3D 或 Multi-Image to 3D。
Export your key
export MESHY_API_KEY="<your-api-key>"
請在終端機中執行此指令(macOS 上的 Terminal,Windows 上的 Command Prompt 或 PowerShell)——而不是在瀏覽器中。
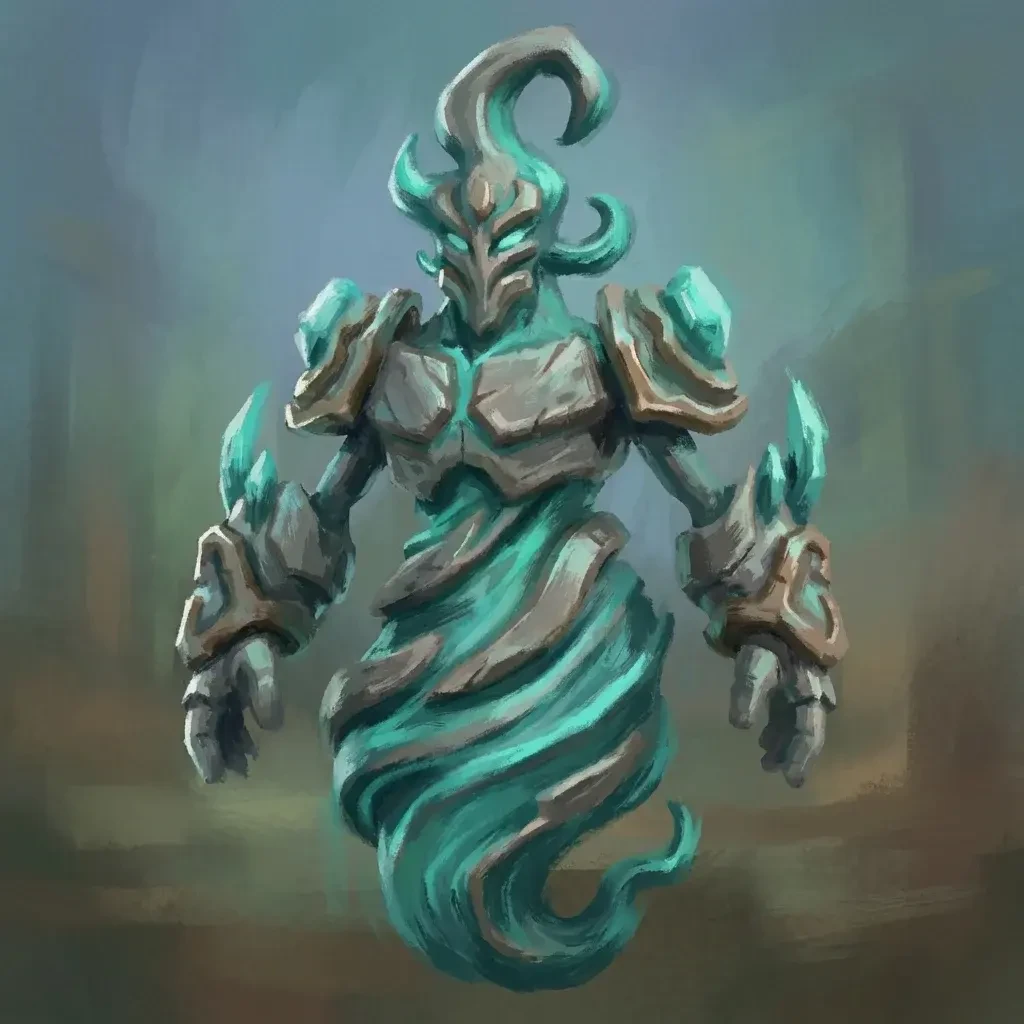
下面的每個範例都使用這張照片——你可以替換成自己的 image_url 來嘗試其他內容。
Request
curl https://api.meshy.ai/openapi/v1/image-to-3d \
  -X POST \
  -H "Authorization: Bearer ${MESHY_API_KEY}" \
  -H "Content-Type: application/json" \
  -d '{
    "image_url": "https://docs.meshy.ai/images/api/quick-start/source-photo.webp"
  }'
3檢查任務狀態
該任務在背景執行,通常需要幾分鐘。輪詢同一個端點,直到 status 變為 SUCCEEDED、FAILED 或 CANCELED,並將下方的 <task_id> 替換為步驟 2 中回傳的 ID。有關典型耗時以及應等待多久,請參閱任務生命週期。
Request
curl https://api.meshy.ai/openapi/v1/image-to-3d/<task_id> \
  -H "Authorization: Bearer ${MESHY_API_KEY}"
Response — SUCCEEDED
{
  "id": "018a210d-8ba4-705c-b111-1f1776f7f578",
  "status": "SUCCEEDED",
  "progress": 100,
  "model_urls": {
    "glb": "https://assets.meshy.ai/***/tasks/018a210d-8ba4-705c-b111-1f1776f7f578/output/model.glb?Expires=***",
    "fbx": "https://assets.meshy.ai/***/tasks/018a210d-8ba4-705c-b111-1f1776f7f578/output/model.fbx?Expires=***"
  },
  "thumbnail_url": "https://assets.meshy.ai/***/tasks/018a210d-8ba4-705c-b111-1f1776f7f578/output/preview.png?Expires=***",
  "task_error": {
    "message": ""
  }
}
4下載你的模型
從上面回應中的 model_urls 取得模型。每種格式(GLB、FBX、OBJ、USDZ、STL)都是一個帶簽章、限時有效的 URL——你也可以跳過指令列,直接將該 URL 貼到瀏覽器網址列中下載。
Download
curl -L "<model_urls.glb from the response above>" -o model.glb
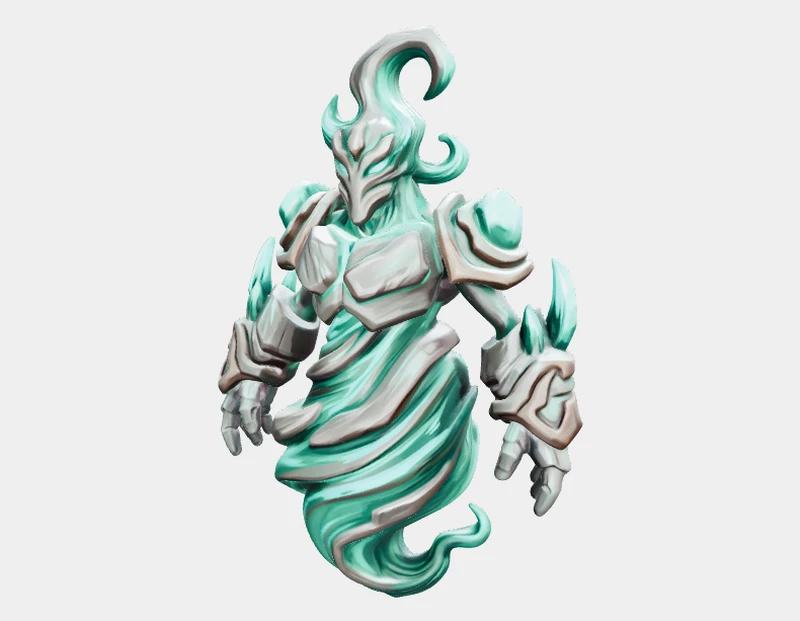
在非企業版方案中,檔案會保留 3 天——詳見資產保留期。
整合到一起
更希望用一個腳本完成整個流程——建立、輪詢、下載?
Full script
import axios from 'axios';
import fs from 'fs';

const headers = { Authorization: `Bearer ${process.env.MESHY_API_KEY}` };
const imageUrl = 'https://docs.meshy.ai/images/api/quick-start/source-photo.webp';

// 1. Create the task
const { data: created } = await axios.post(
  'https://api.meshy.ai/openapi/v1/image-to-3d',
  { image_url: imageUrl },
  { headers, timeout: 60_000 },
);
const taskId = created.result;

// 2. Poll until it finishes, for up to 60 minutes
const deadline = Date.now() + 60 * 60 * 1000;
let task;
while (true) {
  const { data, headers: resHeaders } = await axios.get(
    `https://api.meshy.ai/openapi/v1/image-to-3d/${taskId}`,
    { headers, timeout: 30_000 },
  );
  task = data;
  if (['SUCCEEDED', 'FAILED', 'CANCELED'].includes(task.status)) break;
  if (Date.now() > deadline) {
    // The task is still running. Check it again later with the same task ID instead of creating a new one.
    throw new Error(`Task ${taskId} is still ${task.status}; check it again later`);
  }
  const waitSeconds = Number(resHeaders['retry-after']) || 5;
  await new Promise((resolve) => setTimeout(resolve, waitSeconds * 1000));
}

// 3. Download the result (only if the task succeeded)
if (task.status !== 'SUCCEEDED') {
  throw new Error(`Task ${task.status}: ${task.task_error?.message || 'unknown error'}`);
}
const { data: model } = await axios.get(task.model_urls.glb, { responseType: 'arraybuffer' });
fs.writeFileSync('model.glb', model);
console.log('Saved model.glb');
探索常見工作流程
遊戲就緒角色
為一個人形網格添加骨骼進行 rigging,使其可以在 Unity 或 Unreal 中直接用於動畫。
Learn more →低多邊形資產
在 Image to 3D 中將 model_type 設定為 smart-topology,以取得乾淨、遊戲就緒的網格。
3D 列印模型
將已完成的模型轉換為多色 3MF 檔案,可直接用於切片和列印。
Learn more →後續步驟
- 更喜歡使用 UI?開啟 Developer Platform —— 在 Playground 中執行請求、追蹤用量和請求紀錄,並管理 webhooks。
- 瀏覽完整的 API 參考文件,查看每一個端點。
- 從實際範例中學習:跟隨 Cookbook 中的逐步指南進行操作,並閱讀 Developer Blog 上的教學和建置案例。
- 在正式上線前,請查閱 Pricing、速率限制 和 錯誤。
- 關注 更新日誌 以取得更新和錯誤修復資訊。
- 有意見回饋或遇到問題?歡迎加入我們的 Discord 社群 —— 我們很樂意聽取你的意見!