빠른 시작
API 키를 발급받는 것부터 시작하세요
이 가이드의 모든 요청에는 API 키가 필요합니다. 키를 생성하는 데는 몇 초밖에 걸리지 않습니다.
API 키 생성하기Meshy REST API를 사용하여 첫 3D 모델을 만드는 네 가지 단계입니다.
1API 키 발급받기
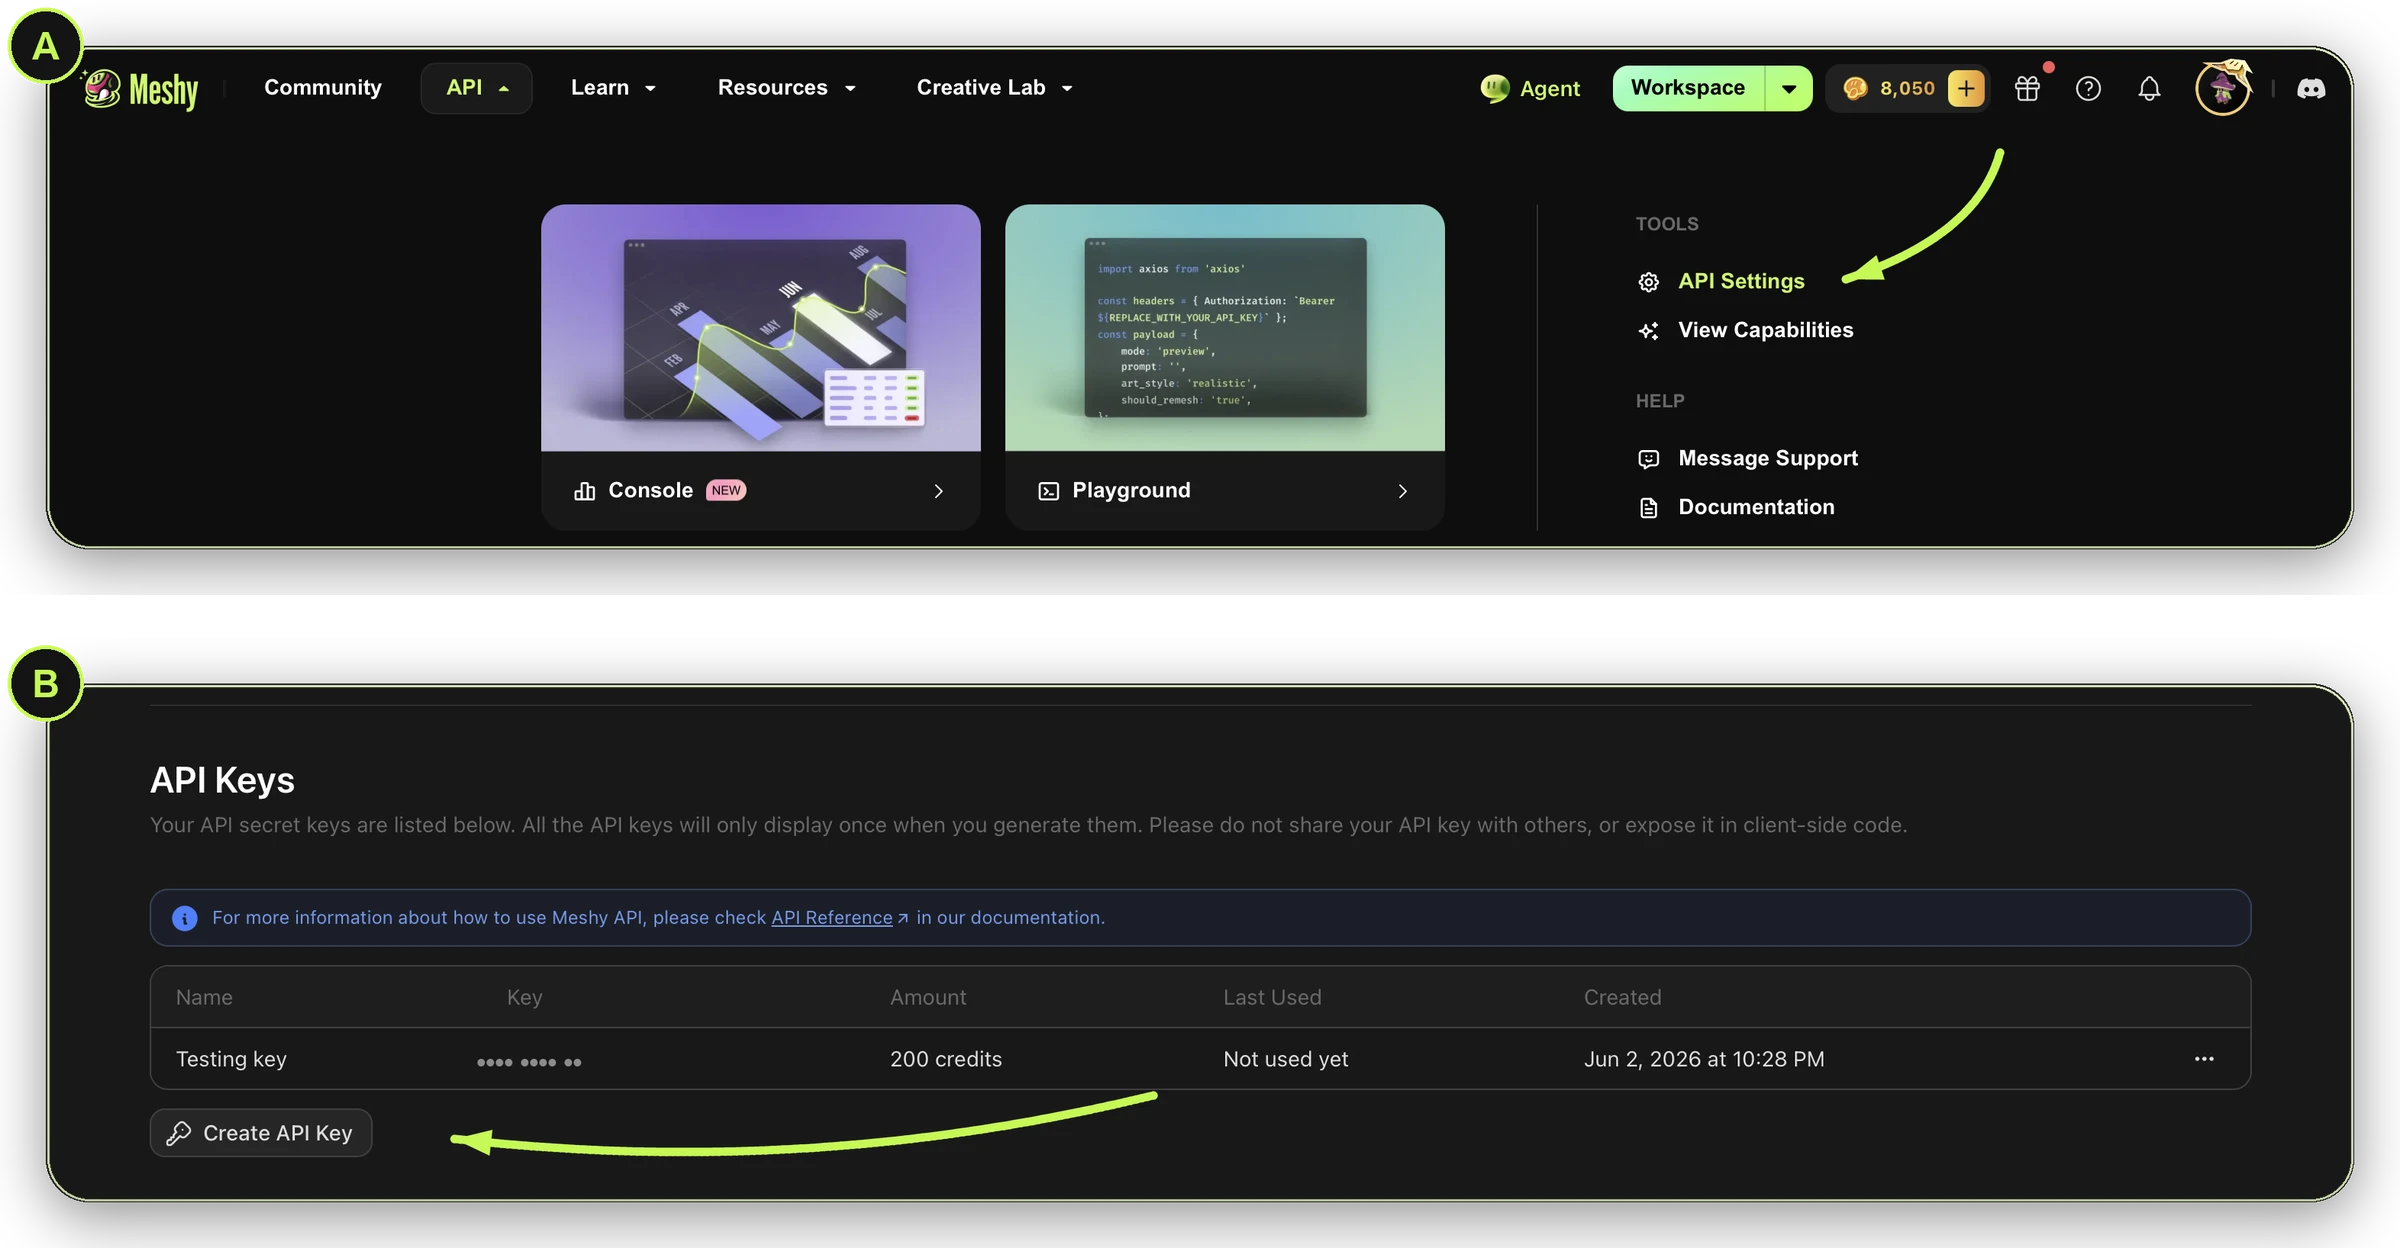
Developer Platform의 API Keys 페이지에서 API 키 생성하기를 진행하세요 — 이 화면을 벗어나면 다시 확인할 수 없으므로 안전한 곳에 보관해 두세요. 모든 요청은 Authorization 헤더에 Bearer 토큰을 사용하여 인증합니다 — 자세한 내용은 Authentication을 참고하세요.
API 키 생성 및 관리는 유료 플랜에서만 가능합니다. 무료 계정에는 Playground에서 테스트할 수 있는 전용 내장 키가 제공되지만, 자체적으로 키를 생성하거나 관리할 수는 없습니다.
보안 팁: 키를 스크립트에 직접 붙여넣지 말고, 대신 환경 변수로 저장하세요: export MESHY_API_KEY="msy_...".
2첫 번째 이미지로 3D 요청 만들기
키를 export한 다음, Image to 3D로 첫 번째 작업을 생성하세요. 텍스트 prompt나 여러 장의 사진으로 작업하고 싶다면 Text to 3D 또는 Multi-Image to 3D를 참고하세요.
Export your key
export MESHY_API_KEY="<your-api-key>"
이는 브라우저가 아닌 터미널(macOS의 Terminal, Windows의 Command Prompt 또는 PowerShell)에서 실행하세요.
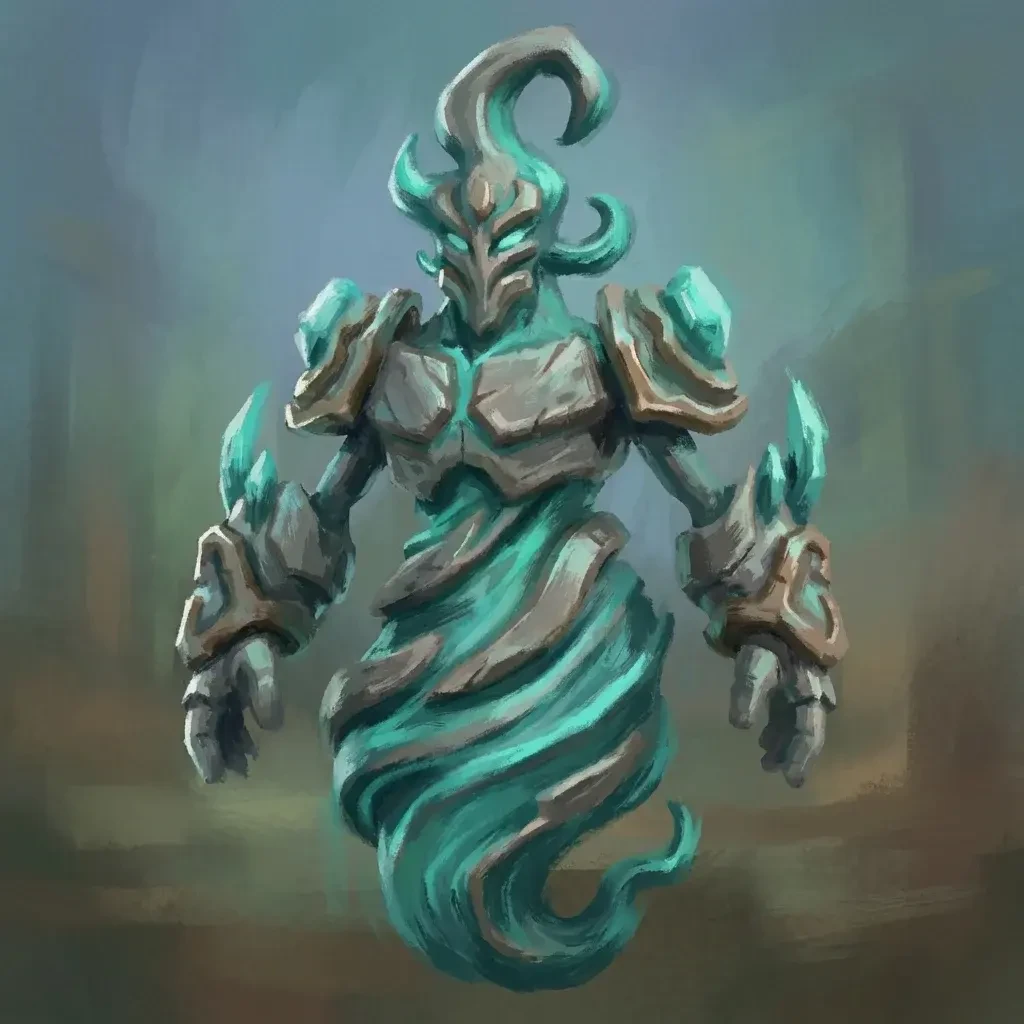
아래의 모든 예제는 이 사진을 사용합니다 — 다른 것을 시도해보려면 사용자 본인의 image_url로 바꿔 넣으세요.
Request
curl https://api.meshy.ai/openapi/v1/image-to-3d \
  -X POST \
  -H "Authorization: Bearer ${MESHY_API_KEY}" \
  -H "Content-Type: application/json" \
  -d '{
    "image_url": "https://docs.meshy.ai/images/api/quick-start/source-photo.webp"
  }'
3작업 상태 확인
작업은 백그라운드에서 실행되며 보통 몇 분 정도 걸립니다. 아래의 <task_id>를 2단계에서 반환된 ID로 바꾸어, status가 SUCCEEDED, FAILED 또는 CANCELED가 될 때까지 동일한 엔드포인트를 폴링하세요. 일반적인 소요 시간과 대기 시간에 대한 자세한 내용은 Task Lifecycle을 참고하세요.
Request
curl https://api.meshy.ai/openapi/v1/image-to-3d/<task_id> \
  -H "Authorization: Bearer ${MESHY_API_KEY}"
Response — SUCCEEDED
{
  "id": "018a210d-8ba4-705c-b111-1f1776f7f578",
  "status": "SUCCEEDED",
  "progress": 100,
  "model_urls": {
    "glb": "https://assets.meshy.ai/***/tasks/018a210d-8ba4-705c-b111-1f1776f7f578/output/model.glb?Expires=***",
    "fbx": "https://assets.meshy.ai/***/tasks/018a210d-8ba4-705c-b111-1f1776f7f578/output/model.fbx?Expires=***"
  },
  "thumbnail_url": "https://assets.meshy.ai/***/tasks/018a210d-8ba4-705c-b111-1f1776f7f578/output/preview.png?Expires=***",
  "task_error": {
    "message": ""
  }
}
폴링 방식이 마음에 들지 않으신가요? SSE streaming 또는 webhook을 사용하면 작업이 완료되는 즉시 알림을 받을 수 있습니다.
4모델 다운로드
위 응답의 model_urls에서 모델을 가져오세요. 각 포맷(GLB, FBX, OBJ, USDZ, STL)은 서명된 시간 제한 URL입니다 — 또는 명령줄을 건너뛰고 URL을 브라우저 주소창에 직접 붙여넣어 다운로드할 수 있습니다.
Download
curl -L "<model_urls.glb from the response above>" -o model.glb
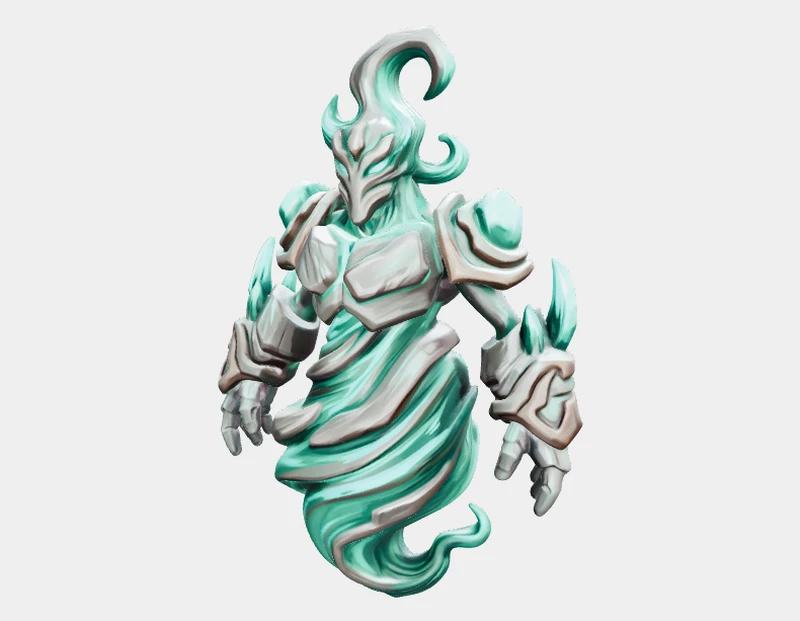
파일은 비(非) 엔터프라이즈 플랜에서 3일간 보관됩니다 — 에셋 보존을 참고하세요.
전부 합치기
생성, 폴링, 다운로드까지 한 번에 처리하는 하나의 스크립트를 선호하시나요?
Full script
import axios from 'axios';
import fs from 'fs';

const headers = { Authorization: `Bearer ${process.env.MESHY_API_KEY}` };
const imageUrl = 'https://docs.meshy.ai/images/api/quick-start/source-photo.webp';

// 1. Create the task
const { data: created } = await axios.post(
  'https://api.meshy.ai/openapi/v1/image-to-3d',
  { image_url: imageUrl },
  { headers, timeout: 60_000 },
);
const taskId = created.result;

// 2. Poll until it finishes, for up to 60 minutes
const deadline = Date.now() + 60 * 60 * 1000;
let task;
while (true) {
  const { data, headers: resHeaders } = await axios.get(
    `https://api.meshy.ai/openapi/v1/image-to-3d/${taskId}`,
    { headers, timeout: 30_000 },
  );
  task = data;
  if (['SUCCEEDED', 'FAILED', 'CANCELED'].includes(task.status)) break;
  if (Date.now() > deadline) {
    // The task is still running. Check it again later with the same task ID instead of creating a new one.
    throw new Error(`Task ${taskId} is still ${task.status}; check it again later`);
  }
  const waitSeconds = Number(resHeaders['retry-after']) || 5;
  await new Promise((resolve) => setTimeout(resolve, waitSeconds * 1000));
}

// 3. Download the result (only if the task succeeded)
if (task.status !== 'SUCCEEDED') {
  throw new Error(`Task ${task.status}: ${task.task_error?.message || 'unknown error'}`);
}
const { data: model } = await axios.get(task.model_urls.glb, { responseType: 'arraybuffer' });
fs.writeFileSync('model.glb', model);
console.log('Saved model.glb');
일반적인 워크플로우 살펴보기
게임용 캐릭터
휴머노이드 메시에 스켈레톤을 적용하여 Unity나 Unreal에서 바로 애니메이션할 수 있도록 리깅하세요.
Learn more →로우폴리 에셋
깔끔하고 게임에 바로 사용할 수 있는 메시를 얻으려면 이미지로 3D에서 model_type을 smart-topology로 설정하세요.
3D 프린트 모델
완성된 모델을 멀티 컬러 3MF 파일로 변환하여 바로 슬라이스하고 출력할 수 있도록 하세요.
Learn more →다음 단계
- UI가 더 편하신가요? Developer Platform을 열어 Playground에서 요청을 실행하고, 사용량과 요청 로그를 추적하며, webhook을 관리해 보세요.
- 모든 엔드포인트를 확인하려면 전체 API reference를 둘러보세요.
- 실제 예제로 배워보세요: Cookbook의 단계별 레시피를 따라 해보고, Developer Blog에서 튜토리얼과 빌드 스토리를 읽어보세요.
- 프로덕션 환경으로 전환하기 전에 요금, Rate Limits, 오류를 확인하세요.
- 업데이트와 버그 수정 사항은 변경 로그에서 확인하세요.
- 피드백이 있거나 문제가 발생했나요? Discord 커뮤니티에 참여해 주세요 — 여러분의 의견을 기다립니다!